APC Symmetra RM Front Panel Battery Replacement
I am in the process of restarting an APC Symmetra RM UPS that has been in storage, powered off, for several years. After I installed new batteries in the SYBT2 modules (I had removed them before storing the unit – see my earlier post) – and pro-actively replacing all the fans – see this post, I powered the unit on.
Unfortunately, I was greeted with this rather ominous message:
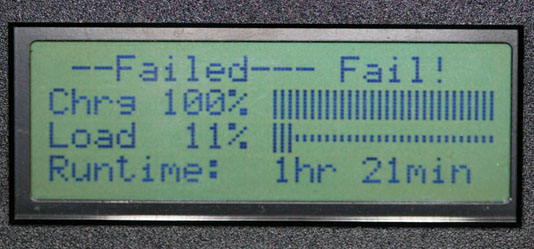
I didn’t know what “–Failed— Fail!” meant, but it didn’t sound good. Scrolling around in the menus, I discovered that the message was apparently coming from the date/time settings:
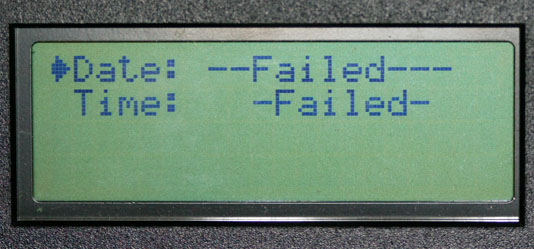
Both the date and the time were displaying the “Failed” messages and it was not possible to edit either field, the way the date and time is normally set. After swapping out various parts including both Intelligence Modules and the Power Module, I decided to try swapping the front panel with one from a different Symmetra unit. The other front panel displayed the date and time properly, leading me to the conclusion that the problem was in the front panel display module, not the Symmetra itself.
I tried using the front panel “Copy” function on the good front panel to copy all of its settings to the UPS, then swapped back to the bad front panel and did a copy operation to copy from the UPS to the bad front panel. That didn’t solve the problem, so it was time to investigate further.
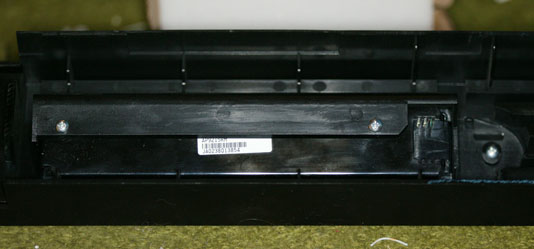
There are three screws on the back of the cover panel which includes the display panel and the APC logo. Two of them directly hold the display module, while one holds the APC medallion (which needs to be removed to remove the front panel):
At that point, it was a simple matter to remove the four screws at each corner which keep the two halves of the front panel housing joined, and I removed the front panel circuit board (actually a stack of two boards, one for the display and another with the circuitry):
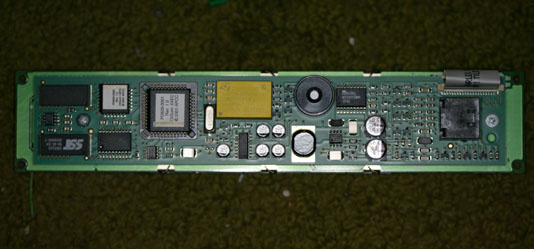
The brownish-yellow rectangular component in the middle of the board is a TIMEKEEPER® SNAPHAT® battery module. This device was designed to “piggyback” on top of a special integrated circuit package, so the battery could be replaced if needed. There are a number of other devices on the market where the battery is not removable, so this is a convenient feature. Here is a close-up of the battery module:
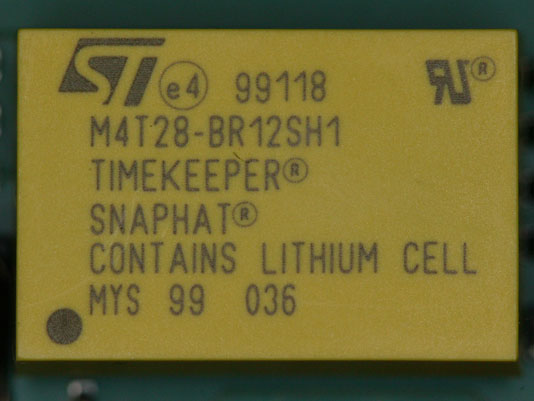
It was a simple matter to carefully remove the battery module, revealing the integrated circuit underneath:

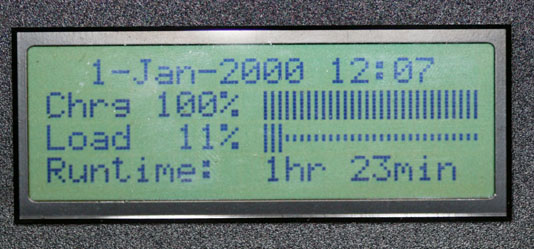
I then installed the new battery, and plugged the panel back in to see what it would display. Fortunately, no further work was needed as it immediately showed the default date and time:
I reassembled the front panel, installed it back in the Symmetra, and set the date and time:
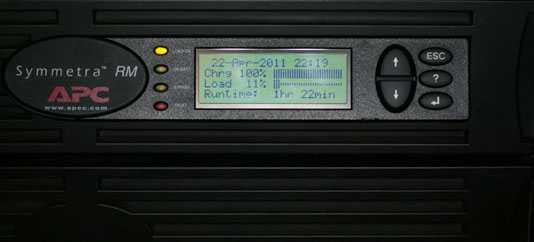
It looks like everything is now working perfectly on that Symmetra, and it was much less expensive than purchasing another front panel (the least expensive used one I could find was around $250), as well as keeping components out of the e-waste stream. The replacement battery cost around $5, plus shipping.
If you perform this repair, or even if you just take a close look at your Symmetra front panel, you will want to make sure you’re running the latest firmware for the front panel. APC calls this “Rackmount PowerView” on their web site, and the latest version is 14. The number like .001 after the 14 is the language version (for example, 1 is English and 5 is Spanish). In order to update the panel firmware you’ll need the rather odd Y-cable that came with your Symmetra – it adds a 9-pin serial connector in between the front panel and the intelligence module. Full instructions are on the APC web site.
