UPDATED May 4th, 2007
Today we’ll take a look inside the Linksys NSS4000. This is the entry-level unit in the Linksys One network storage family. You can read the official Linksys literature here, but technical info is rather lacking there (they don’t even say how much RAM is in the unit).
First, let’s take a look at the mainboard (click the image to enlarge):
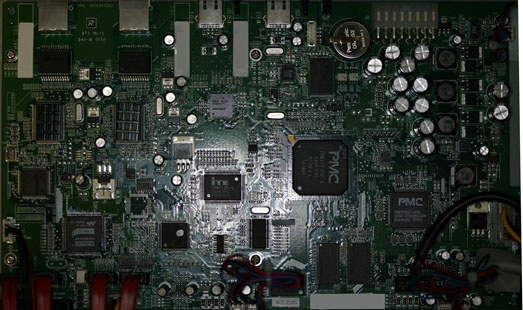
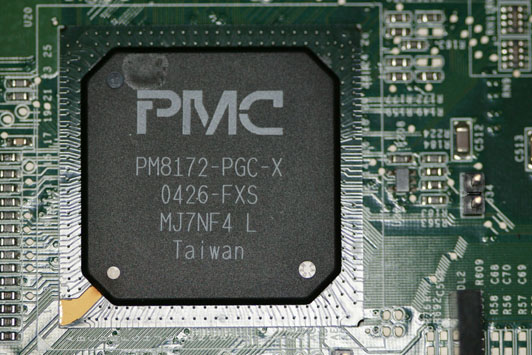
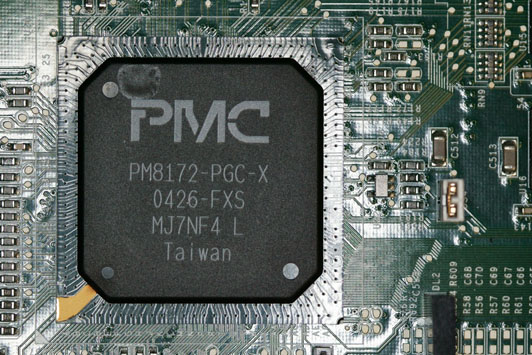
The processor is a PMC-Sierra RM7035C, part of the MIPS family, running at 600MHz. A PM8172 system controller provides the interface for most other peripheral controllers on the board, as well as being the attachment point for the system’s 128KB of Hynix SDRAM. Other notable components are an ITE IT8712 Super I/O controller and IT8907E USB flash controller, connected to a 512MB Samsung flash chip; Promise PDC40518 SATA controller; NEC UPD720101 USB 2.0 controller; SafeXcel 1741 security co-processor; two Marvell Yukon Lite 10/100/1000 Ethernet controllers (under heat sinks), and a MX 29LV800CBTC 1MB boot flash.
Upon initial observation, there is a 4-pin connector labeled “J29 CONSOLE” near the back edge of the board:
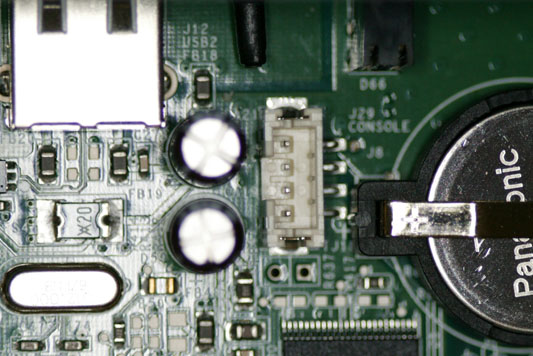
It turns out that this connector has the exact same pinout as the Linksys NSLU2’s serial port, as described here. Linksys was even nice enough to pre-install a connector for us. I made a cable out of an old Sound Blaster cable (connectors / pins) and a piece of USB cable (wire). There is just enough room to snake the cable into the chassis via the RPS (Redundant Power System) connector opening on the rear:
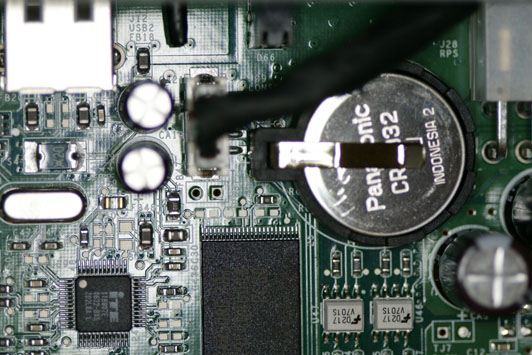
This was enough to get a serial console working, to observe the bootstrap procedure. Here is a complete log of the boot process, from PMON start through the Linux login prompt:
PMON2000 MIPS Initializing. Standby...ERRORPC=80102c4c CONFIG=404664b0 STATUS=00410000
CPU PRID 00002753
Initializing SDRAM controller
Clearing first 1MB of memory...done
Sizing caches...
Initializing L1 cache...done
Initializing L2 cache...enabling...done
Testing first MB of RAM...
Wlk-1 OK! Wlk-0 OK! OwnAddr OK! Copy PMON to execute location...done
Booting compressed image.
Wlk-1 OK! Wlk-0 OK! OwnAddr OK! mainbus0 (root)
pcibr0 at mainbus0
pci0 at pcibr0 bus 0
vendor "ITExpress", unknown product 0x0801 rev 0xb1 at pci0 dev 1 function 0 not configured
vendor "ITExpress", unknown product 0x8172 rev 0x10 at pci0 dev 1 function 1 not configured
ohci0 at pci0 dev 1 function 3 vendor "ITExpress", unknown product 0x1234 rev 0x07: generic poll, version 1.0, legacy support
usb1 at ohci0: USB revision 1.0
uhub1 at usb1
uhub1: class 9/0 rev 1.00/1.00, addr 1
uhub1: 2 ports with 2 removable, self powered
vendor "ITExpress", unknown product 0x8172 rev 0x11 at pci0 dev 1 function 4 not configured
vendor "ITExpress", unknown product 0x8172 rev 0x10 at pci0 dev 1 function 6 not configured
"SafeNet SafeXcel" rev 0x01 at pci0 dev 16 function 0 not configured
ohci1 at pci0 dev 17 function 0 "NEC USB" rev 0x43: generic poll, version 1.0
usb2 at ohci1: USB revision 1.0
uhub2 at usb2
uhub2: class 9/0 rev 1.00/1.00, addr 1
uhub2: 3 ports with 3 removable, self powered
ohci2 at pci0 dev 17 function 1 "NEC USB" rev 0x43: generic poll, version 1.0
usb3 at ohci2: USB revision 1.0
uhub3 at usb3
uhub3: class 9/0 rev 1.00/1.00, addr 1
uhub3: 2 ports with 2 removable, self powered
ehci0 at pci0 dev 17 function 2 "NEC USB" rev 0x04: generic poll
ehci0: EHCI version 1.0
ehci0: companion controllers, 3 ports each: ohci1 ohci2
usb0 at ehci0: USB revision 2.0
uhub0 at usb0
uhub0: class 9/0 rev 2.00/1.00, addr 1
uhub0: 5 ports with 5 removable, self powered
skc0 at pci0 dev 18 function 0 "Marvell Yukon 88E8001/8003/8010" rev 0x10, Marvell Yukon Lite (0x9): generic poll
sk0 at skc0 port A, address aa:bb:cc:dd:ee:ff
eephy0 at sk0 phy 0: Marvell 88E1011 Gigabit PHY, rev. 5
vendor "Promise", unknown product 0x3d18 rev 0x02 at pci0 dev 19 function 0 not configured
skc1 at pci0 dev 20 function 0 "Marvell Yukon 88E8001/8003/8010" rev 0x10, Marvell Yukon Lite (0x9): generic poll
sk1 at skc1 port A, address aa:bb:cc:dd:ee:ff
eephy1 at sk1 phy 0: Marvell 88E1011 Gigabit PHY, rev. 5
umass0 at uhub0 port 1 configuration 1 interface 0
umass0: rev 2.00/2.00, addr 2 using umass0 over SCSI
scsibus0 at umass0: 2 targets
sd0 at scsibus0 targ 1 lun 0:  SCSI2 0/direct removable
sd0: 499MB, 499 cyl, 64 head, 32 sec, 512 bytes/sec, 1022976 sec total
System init done.Configuration [PM74101,EL,NET,SCSI]
Version: PMON2000 3.1.17-B019 (PM74101) #0: Mon Jan  8 12:24:25 PST 2007.
Supported loaders [srec, elf, bin]
Supported filesystems [net, fat, disk, tty, ram]
This software may be redistributed under the BSD copyright.
Copyright 2005, PMC-Sierra, Inc.
CPU RM7000 @ 601.28 MHz / Bus @ 100.21 MHz
Memory size 128 MB.
Primary Instruction cache size 16KB (32 line, 4 way)
Primary Data cache size 16KB (32 line, 4 way)
Secondary cache size 256KB
Diagnostic Test Started
===============================================================
PCI test started ..................
Testing PCI Device NEC USB Controller
Testing PCI Device Promise SATA Controller
Testing PCI Device Marvell Gigabit Ethernet Controller
Testing PCI Device Safenet SafeXel encryptor
PCI test finished .................  SUCCESS
USB test started ..................
USB test finished .................  SUCCESS
LPC test started ..................
Testing LPC Environment Controller
Testing LPC GPIO Controller
LPC: GPIO Controller Passed
LPC test finished .................  SUCCESS
RTC test started ..................
Setting the time as Sun Jan  1 00:00:00 GMT 2006
RTC test finished .................  SUCCESS
Mfg  0, Id  0
Could not find Flash Area to write
***************************************************************
*            Diagnostic Test Status of this device            *
***************************************************************
* Memory Test                               -   SUCCESS       *
* NEC USB Controller                        -   SUCCESS       *
* Promise SATA Controller                   -   SUCCESS       *
* Marvell Gigabit Ethernet Controller       -   SUCCESS       *
* Safenet SafeXel encryptor                 -   SUCCESS       *
* USB OnBoard FLASH                         -   SUCCESS       *
* LPC Device                                -   SUCCESS       *
* LPC: Environment Controller               -   SUCCESS       *
* LPC: GPIO Controller                      -   SUCCESS       *
* RTC setting                               -   SUCCESS       *
* UDI Programming                           -   FAILED        *
***************************************************************
Diagnostic test completed. Test Status - FAILURE
===============================================================
Hit any key to return to PMON prompt or power down.
>
Autoboot command: "boot /dev/sd0@0x100 root=/dev/scsibd2 hwrev=3"
Press  to execute now or any other key to abort.
 1
Loading file: /dev/sd0@0x100 [elf32] [mips4] [32bitmode]
ffffffff80100000/53d085(5492869) + ffffffff8063d085/22f9b(z) + ehci_shutdown: stopping the HC
ohci_shutdown: stopping the HC
ohci_shutdown: stopping the HC
ohci_shutdown: stopping the HC
setting pci bus 0 device 1 function 0 reg 10 to default: 0x14017001
setting pci bus 0 device 1 function 5 reg 20 to default: 0x01401780
Linux version 2.6.18 (build@schnitzel) (gcc version 3.3.6) #1 Fri Jan 26 02:36:34 PST 2007
UDI: initializing
UDI: found UDI at offset 0xa80ff000
UDI: V2 info format
UDI: hardware revision is 3
UDI: available
memsize: 128
Memory size: 128MB
CPU revision is: 00002753
FPU revision is: 00002750
Found IT8712 Super IO
Determined physical RAM map:
 memory: 08000000 @ 00000000 (usable)
Built 1 zonelists.  Total pages: 32768
Kernel command line: root=/dev/scsibd2 hwrev=3 console=ttyS0,115200
Primary instruction cache 16kB, physically tagged, 4-way, linesize 32 bytes.
Primary data cache 16kB, 4-way, linesize 32 bytes.
Secondary cache size 256K, linesize 32 bytes.
Synthesized TLB refill handler (23 instructions).
Synthesized TLB load handler fastpath (35 instructions).
Synthesized TLB store handler fastpath (35 instructions).
Synthesized TLB modify handler fastpath (34 instructions).
PID hash table entries: 1024 (order: 10, 4096 bytes)
calculating r4koff... 0012597e(1202558)
CPU frequency 601.28 MHz
Using 300.640 MHz high precision timer.
Dentry cache hash table entries: 16384 (order: 4, 65536 bytes)
Inode-cache hash table entries: 8192 (order: 3, 32768 bytes)
Memory: 123264k/131072k available (4092k kernel code, 7664k reserved, 1107k data , 164k init, 0k highmem)
Mount-cache hash table entries: 512
Checking for 'wait' instruction...  available.
NET: Registered protocol family 16
SCSI subsystem initialized
usbcore: registered new driver usbfs
usbcore: registered new driver hub
NET: Registered protocol family 2
IP route cache hash table entries: 1024 (order: 0, 4096 bytes)
TCP established hash table entries: 4096 (order: 2, 16384 bytes)
TCP bind hash table entries: 2048 (order: 1, 8192 bytes)
TCP: Hash tables configured (established 4096 bind 2048)
TCP reno registered
UDI: created "/proc/manuinfo" entry
VFS: Disk quotas dquot_6.5.1
Dquot-cache hash table entries: 1024 (order 0, 4096 bytes)
squashfs: version 3.1 (2006/08/19) Phillip Lougher
Installing knfsd (copyright (C) 1996 okir@monad.swb.de).
NTFS driver 2.1.27 [Flags: R/O].
JFFS2 version 2.2. (NAND) (C) 2001-2006 Red Hat, Inc.
SGI XFS with ACLs, large block numbers, no debug enabled
SGI XFS Quota Management subsystem
Initializing Cryptographic API
io scheduler noop registered
io scheduler anticipatory registered
io scheduler deadline registered
io scheduler cfq registered (default)
it8172 fixup: Configuring Audio adapter 0000:00:01.0
Generic RTC Driver v1.07
GPIO poller thread started.
GPIO at 0x14013800 (irq = 20)
powerdn: pwdnInit
Watchdog Timer (ITE 8712) Initialized
is_watchdog_running()(0x0), WDT Timeout Value (0x0)...
watchdog_init(): Did not spawn it8712_wdt_ctrl_kthread...
Serial: 8250/16550 driver $Revision: 1.6 $ 4 ports, IRQ sharing disabled
serial8250: ttyS0 at I/O 0x14011800 (irq = 23) is a 16550A
serial8250: ttyS1 at I/O 0x140003f8 (irq = 4) is a 16550A
serial8250: ttyS2 at I/O 0x14012000 (irq = 24) is a 16550A
serial8250: ttyS3 at I/O 0x14012800 (irq = 25) is a 16550A
loop: loaded (max 8 devices)
skge 1.6 addr 0x10104000 irq 39 chip Yukon-Lite rev 9
skge eth0: addr aa:bb:cc:dd:ee:ff
skge 1.6 addr 0x10108000 irq 40 chip Yukon-Lite rev 9
skge eth1: addr aa:bb:cc:dd:ee:ff
tun: Universal TUN/TAP device driver, 1.6
tun: (C) 1999-2004 Max Krasnyansky
Board Hardware Revision: 3
libata: Powering drive 1 (gpio 19)
libata: Powering drive 2 (gpio 18)
libata: Powering drive 3 (gpio 17)
libata: Powering drive 4 (gpio 16)
ata1: SATA max UDMA/133 cmd 0xB010E200 ctl 0xB010E238 bmdma 0x0 irq 41
ata2: SATA max UDMA/133 cmd 0xB010E280 ctl 0xB010E2B8 bmdma 0x0 irq 41
ata3: SATA max UDMA/133 cmd 0xB010E300 ctl 0xB010E338 bmdma 0x0 irq 41
ata4: SATA max UDMA/133 cmd 0xB010E380 ctl 0xB010E3B8 bmdma 0x0 irq 41
scsi0 : sata_promise
ata1: SRST failed (status 0xFF)
ata1: SRST failed (err_mask=0x100)
ata1: softreset failed, retrying in 5 secs
ata1: SATA link up 1.5 Gbps (SStatus 113 SControl 300)
ata1.00: ATA-7, max UDMA/133, 781422768 sectors: LBA48 NCQ (depth 0/32)
ata1.00: configured for UDMA/133
scsi1 : sata_promise
ata2: SATA link up 1.5 Gbps (SStatus 113 SControl 300)
ata2.00: ATA-7, max UDMA/133, 781422768 sectors: LBA48 NCQ (depth 0/32)
ata2.00: configured for UDMA/133
scsi2 : sata_promise
ata3: SATA link up 1.5 Gbps (SStatus 113 SControl 300)
ata3.00: ATA-7, max UDMA/133, 781422768 sectors: LBA48 NCQ (depth 0/32)
ata3.00: configured for UDMA/133
scsi3 : sata_promise
ata4: SATA link up 1.5 Gbps (SStatus 113 SControl 300)
ata4.00: ATA-7, max UDMA/133, 781422768 sectors: LBA48 NCQ (depth 0/32)
ata4.00: configured for UDMA/133
  Vendor: ATA       Model: ST3400832AS       Rev: 3.01
  Type:   Direct-Access                      ANSI SCSI revision: 05
  Vendor: ATA       Model: ST3400832AS       Rev: 3.01
  Type:   Direct-Access                      ANSI SCSI revision: 05
  Vendor: ATA       Model: ST3400832AS       Rev: 3.01
  Type:   Direct-Access                      ANSI SCSI revision: 05
  Vendor: ATA       Model: ST3400832AS       Rev: 3.01
  Type:   Direct-Access                      ANSI SCSI revision: 05
SCSI device sda: 781422768 512-byte hdwr sectors (400088 MB)
sda: Write Protect is off
SCSI device sda: drive cache: write back
SCSI device sda: 781422768 512-byte hdwr sectors (400088 MB)
sda: Write Protect is off
SCSI device sda: drive cache: write back
 sda:
sd 0:0:0:0: Attached scsi disk sda
SCSI device sdb: 781422768 512-byte hdwr sectors (400088 MB)
sdb: Write Protect is off
SCSI device sdb: drive cache: write back
SCSI device sdb: 781422768 512-byte hdwr sectors (400088 MB)
sdb: Write Protect is off
SCSI device sdb: drive cache: write back
 sdb:
sd 1:0:0:0: Attached scsi disk sdb
SCSI device sdc: 781422768 512-byte hdwr sectors (400088 MB)
sdc: Write Protect is off
SCSI device sdc: drive cache: write back
SCSI device sdc: 781422768 512-byte hdwr sectors (400088 MB)
sdc: Write Protect is off
SCSI device sdc: drive cache: write back
 sdc:
sd 2:0:0:0: Attached scsi disk sdc
SCSI device sdd: 781422768 512-byte hdwr sectors (400088 MB)
sdd: Write Protect is off
SCSI device sdd: drive cache: write back
SCSI device sdd: 781422768 512-byte hdwr sectors (400088 MB)
sdd: Write Protect is off
SCSI device sdd: drive cache: write back
 sdd:
sd 3:0:0:0: Attached scsi disk sdd
sd 0:0:0:0: Attached scsi generic sg0 type 0
sd 1:0:0:0: Attached scsi generic sg1 type 0
sd 2:0:0:0: Attached scsi generic sg2 type 0
sd 3:0:0:0: Attached scsi generic sg3 type 0
physmap-flash.0: failed to claim resource 0
ehci_hcd 0000:00:11.2: EHCI Host Controller
ehci_hcd 0000:00:11.2: new USB bus registered, assigned bus number 1
ehci_hcd 0000:00:11.2: irq 40, io mem 0x1010f000
ehci_hcd 0000:00:11.2: USB 2.0 started, EHCI 1.00, driver 10 Dec 2004
usb usb1: configuration #1 chosen from 1 choice
hub 1-0:1.0: USB hub found
hub 1-0:1.0: 5 ports detected
ohci_hcd 0000:00:01.3: Itentionally disabling ITE USB controller.
ohci_hcd 0000:00:01.3: init 0000:00:01.3 fail, -19
ohci_hcd 0000:00:11.0: OHCI Host Controller
ohci_hcd 0000:00:11.0: new USB bus registered, assigned bus number 2
ohci_hcd 0000:00:11.0: irq 38, io mem 0x1010c000
usb usb2: configuration #1 chosen from 1 choice
hub 2-0:1.0: USB hub found
hub 2-0:1.0: 3 ports detected
ohci_hcd 0000:00:11.1: OHCI Host Controller
ohci_hcd 0000:00:11.1: new USB bus registered, assigned bus number 3
ohci_hcd 0000:00:11.1: irq 39, io mem 0x1010d000
usb 1-1: new high speed USB device using ehci_hcd and address 2
usb usb3: configuration #1 chosen from 1 choice
hub 3-0:1.0: USB hub found
hub 3-0:1.0: 2 ports detected
usb 1-1: configuration #1 chosen from 1 choice
Initializing USB Mass Storage driver...
scsi4 : SCSI emulation for USB Mass Storage devices
  Vendor: ITE TECH  Model:  PEN DRIVE Flash  Rev: 2.20
  Type:   Direct-Access                      ANSI SCSI revision: 02
Hooray! Discovered SCSI boot device!
host_no [4], channel [0], id [0], lun [0]
SCSI device sde: 1022976 512-byte hdwr sectors (524 MB)
sde: Write Protect is off
sde: assuming drive cache: write through
SCSI device sde: 1022976 512-byte hdwr sectors (524 MB)
sde: Write Protect is off
sde: assuming drive cache: write through
 sde: sde1 sde2 sde3 sde4
SCSI device scsibd: 1022976 512-byte hdwr sectors (524 MB)
scsibd: Write Protect is off
scsibd: assuming drive cache: write through
 scsibd: scsibd1 scsibd2 scsibd3 scsibd4
sd 4:0:0:0: Attached scsi removable disk scsibd
sd 4:0:0:0: Attached scsi generic sg4 type 0
usbcore: registered new driver usb-storage
USB Mass Storage support registered.
usbcore: registered new driver hiddev
usbcore: registered new driver usbhid
drivers/usb/input/hid-core.c: v2.6:USB HID core driver
Non-volatile memory driver v1.0
i2c /dev entries driver
Initialize ITE IIC adapter module
 found device at 0x14014030 irq 0.
ITE iic (i2c) algorithm module
it87: Device not activated, enabling
it87: Found IT8712F chip at 0x290, revision 8
hwmon-vid: Unknown VRM version of your CPU
md: linear personality registered for level -1
md: raid0 personality registered for level 0
md: raid1 personality registered for level 1
md: raid10 personality registered for level 10
raid6: int32x1    129 MB/s
raid6: int32x2    152 MB/s
raid6: int32x4    217 MB/s
raid6: int32x8    170 MB/s
raid6: using algorithm int32x4 (217 MB/s)
md: raid6 personality registered for level 6
md: raid5 personality registered for level 5
md: raid4 personality registered for level 4
raid5: measuring checksumming speed
   8regs     :   550.000 MB/sec
   8regs_prefetch:   519.000 MB/sec
   32regs    :   643.000 MB/sec
   32regs_prefetch:   602.000 MB/sec
raid5: using function: 32regs (643.000 MB/sec)
md: md driver 0.90.3 MAX_MD_DEVS=256, MD_SB_DISKS=27
md: bitmap version 4.39
device-mapper: ioctl: 4.7.0-ioctl (2006-06-24) initialised: dm-devel@redhat.com
ip_tables: (C) 2000-2006 Netfilter Core Team
TCP bic registered
NET: Registered protocol family 1
NET: Registered protocol family 17
802.1Q VLAN Support v1.8 Ben Greear
All bugs added by David S. Miller
drivers/rtc/hctosys.c: unable to open rtc device (rtc0)
md: Autodetecting RAID arrays.
md: autorun ...
md: ... autorun DONE.
Root device ("/dev/scsibd2") is now online.
VFS: Mounted root (squashfs filesystem) readonly.
Freeing unused kernel memory: 164k freed
Doing sysinit
Mounting procfs
Mounting sysfs
Starting udev
Mounting nfsd
Mounting tmpfs on /var (limited to [5242880] bytes)
Mounting tmpfs on /tmp
Mounting tmpfs on /mnt (limited to [131072] bytes)
Creating dev entries for mtdblock devices...
Boot device was /dev/scsibd, making partitions and
mounting linuxrtconfig on /linuxrwfs (jffs2)...
trying to mount jffs2 as rw partition...
block2mtd: version $Revision: 1.1.1.3 $
actual jffs2 partition erase size will be [0x20000]...
block2mtd: default erase size is [4096]
block2mtd: mtd0: [d: /dev/scsibd1] erase_size = 128KiB [131072]
block2mtd module loaded successfully.
jffs2 will use mtdblock0
Trying to mount jffs2 on /linuxrwfs...
block2mtd: Overrun end of disk in cache readahead
jffs2 mounted on /linuxrwfs
Starting udevd...
Starting udevtrigger...
Starting udevsettle...
Making useful softlinks...
Removing hotplug...
Mounting devpts...
Start executing startup scripts...
/etc/init.d/S01sysinit(start): doing some sysinit stuff...
Dirty shutdown counter looks good...
Dirty shutdown count is [3]
Previous shutdown was dirty, message to user set...
Checking the sanity of the rw file system...
Softlinking /dev/sd0 to /dev/scsibd (bootenv may need it)...
/etc/init.d/S01sysinit(start): OK
/etc/init.d/S02checkroot(start): OK
/etc/init.d/S02hwdep(start): Fixing gpio.conf files...
Board hardware revision is [3].
gpio.conf already exists (OK)
/etc/init.d/S03modules(start): OK
/etc/init.d/S04raid(start): Starting up raids...
Making additional md devices...
Updating exports...
found /etc/nas/spindown -- setting new spindown timeout...
SATA spindown timeout set to 86400 seconds...
Default RAID metadata version is 1.2 .
There is no /etc/nas/uuids_stopped file -- starting all available arrays...
md: md0 stopped.
md: bind
md: bind
md: bind
md: bind
md: md0: raid array is not clean -- starting background reconstruction
raid5: device sda operational as raid disk 0
raid5: device sdd operational as raid disk 3
raid5: device sdc operational as raid disk 2
raid5: device sdb operational as raid disk 1
raid5: allocated 4212kB for md0
raid5: raid level 5 set md0 active with 4 out of 4 devices, algorithm 2
RAID5 conf printout:
 --- rd:4 wd:4 fd:0
 disk 0, o:1, dev:sda
 disk 1, o:1, dev:sdb
 disk 2, o:1, dev:sdc
 disk 3, o:1, dev:sdd
md: syncing RAID array md0
md: minimum _guaranteed_ reconstruction speed: 1000 KB/sec/disc.
md: using maximum available idle IO bandwidth (but not more than 7000 KB/sec) for reconstruction.
md: using 128k window, over a total of 390711232 blocks.
md: resuming recovery of md0 from checkpoint.
mdadm: /dev/md/0 has been started with 4 drives.
1853
/etc/init.d/S04raid(start): OK
/etc/init.d/S05lvm(start): Starting up lvm...
  Reading all physical volumes.  This may take a while...
  Found volume group "RAIDA" using metadata type lvm2
  WARNING: This metadata update is NOT backed up
  WARNING: This metadata update is NOT backed up
  1 logical volume(s) in volume group "RAIDA" now active
/etc/init.d/S05lvm(start): OK
/etc/init.d/S06mount(start): Mounting file systems...
Running 70's disco mount...
  Reading all physical volumes.  This may take a while...
  Found volume group "RAIDA" using metadata type lvm2
  WARNING: This metadata update is NOT backed up
  WARNING: This metadata update is NOT backed up
  1 logical volume(s) in volume group "RAIDA" now active
Checking for RAIDA - TEST
Updated Fstab...[/dev/RAIDA/TEST        /mnt/RAIDA/TEST]
Check mount point for /mnt/RAIDA/TEST
Mount point DOES NOT exist
Filesystem "dm-0": Disabling barriers, not supported by the underlying device
XFS mounting filesystem dm-0
Starting XFS recovery on filesystem: dm-0 (logdev: internal)
Ending XFS recovery on filesystem: dm-0 (logdev: internal)
Adding include path /mnt/RAIDA/TEST/.config/smb.conf
Updated Fstab...[/mnt/RAIDA/TEST/share1 /mnt/ftp_dir/share1]
  Reading all physical volumes.  This may take a while...
  Found volume group "RAIDA" using metadata type lvm2
  WARNING: This metadata update is NOT backed up
/etc/init.d/S06mount(start): OK
/etc/init.d/S07mtd(start): Making read-only mtd character devices...
/etc/init.d/S07mtd(start): OK
/etc/init.d/S08tmpfs(start): Preparing tmpfs directories...
Making directories in /var:
+run...
+log directories and files (httpd, messages, wtmp, lastlog, cups, samba)...
+cache...
+empty...
+ftp...
+spool directories (cups, cron)...
+tmp...
+lock directories (apache, lvm, subsys, samba)...
+lib directories (nfs, snmp)...
+state directories...
+yp directories...
+samba private dir...
Done making /var directories.
Making anon ftp user dir...
/etc/init.d/S08tmpfs(start): OK
/etc/init.d/S09sensors(start): Setting up sensors ...
/etc/init.d/S09sensors(start): OK
Initializing random number generator... done.
/etc/init.d/S21fixrandom(start): Fixing random devices...
/etc/init.d/S21fixrandom(start): OK
/etc/init.d/S25safenet(start): Starting crypto (loading aes)...
/etc/init.d/S25safenet(start): OK
/etc/init.d/S30certs(start): Generating self-signing certs (if necessary)...
/etc/init.d/S30certs(start): OK
Flushing all current rules and user defined chains: SUCCESS:
Clearing all current rules and user defined chains: SUCCESS:
Applying iptables firewall rules:  SUCCESS:
Setting hostname:  NAS0018f804fa07
Starting network...
+starting loopback interface
Dynamic network was not running lo
udhcpc was not running for lo
Autoipd was not running for lo
No bonding device present.
Device lo is present and available
This is not a slave device
 DHCP not used on device lo
 Bringing up lo
arping: Interface lo is not ARPable
Updating ARP cache of other devices on this subnet. Please wait 2 sec.
arping: Interface lo is not ARPable
ARP tables updated successfully.
Adding route add 127.0.0.0/8 dev lo
+starting ifplugd...
Starting Network Interface Plugging Daemon:No bonding device present.
bond0
Doing insmode for bonding module...
Ethernet Channel Bonding Driver: v3.0.3 (March 23, 2006)
bonding: MII link monitoring set to 100 ms
Device bond0 is present and available
This is a master device. Bringing link down and then up.
Bringing up master link for bond.
Dynamic network was not running eth0
udhcpc was not running for eth0
Autoipd was not running for eth0
No bonding device present.
Device eth0 is present and available
Enslaving eth0 to bond0
bonding: bond0: enslaving eth0 as a backup interface with a down link.
Dynamic network was not running eth1
udhcpc was not running for eth1
Autoipd was not running for eth1
No bonding device present.
Device eth1 is present and available
Enslaving eth1 to bond0
bonding: bond0: enslaving eth1 as a backup interface with a down link.
Restarting vblade service
Stopping /sbin/nas_vblade...OK
Restoring raw socket buffer sizes...OK
skge eth0: Link is up at 1000 Mbps, full duplex, flow control tx and rx
bonding: bond0: link status up for interface eth0, enabling it in 200 ms.
bonding: bond0: link status definitely up for interface eth0.
bonding: bond0: making interface eth0 the new active one.
bonding: bond0: first active interface up!
Stopping /sbin/nas_vblade...OK
udhcpc[2175]: udhcpc (v0.9.9-pre) started
skge eth0: Link is up at 1000 Mbps, full duplex, flow control tx and rx
udhcpc[2175]: Sending discover...
.
Waiting for network (60 second max):
 + (try#1/12) Currently 1 active interfaces:
   + bond0 : IP address not set
udhcpc[2175]: Sending discover...
udhcpc[2175]: Sending select for 10.20.30.40...
udhcpc[2175]: Lease of 10.20.30.40 obtained, lease time 86400
 + (try#2/12) Currently 1 active interfaces:
   + bond0 : 10.20.30.40
NET OK: All active interfaces are online.
Starting Disk Aggregation Server...
Stopping /sbin/nas_vblade...OK
Starting ntpd: syncing (timeout in 20 seconds): OK
Starting /sbin/portmap: OK
Starting dropbear (from tcpserver): OK
Starting /sbin/rpc.statd: OK
Starting nfs services:
Starting nfs quotas:
Starting nfs daemon:
Starting nfs mountd:
/etc/init.d/S60vsftpd: setting maximum 2 connections
/etc/init.d/S60vsftpd: setting maximum 2 connections per IP
Starting vsftpd (from tcpserver): OK
/etc/init.d/S82httpdswiw: setting maximum 99 connections
/etc/init.d/S82httpdswiw: setting maximum 99 connections per IP
Starting httpdswiw (from tcpserver): OK
Starting httpdsl1 (from tcpserver): OK
/etc/init.d/S84httpds: setting maximum 99 connections
/etc/init.d/S84httpds: setting maximum 99 connections per IP
Starting httpds (from tcpserver): OK
/etc/init.d/S85httpd: setting maximum 99 connections
/etc/init.d/S85httpd: setting maximum 99 connections per IP
Starting httpd (from tcpserver): OK
Starting UPnP daemon: OK
/etc/init.d/S90samba: setting maximum 15 connections
Starting samba: secrets.tdb : 1 records
OK
Starting winbind daemon: OK
Starting CRON daemon: OK
Starting auto nice daemon:/usr/sbin/and[2500]: Configuration file is: /etc/and.conf
/usr/sbin/and[2500]: Priority database is: /etc/and.priorities
/usr/sbin/and[2500]: AND ready.
 done
Starting Discovery Agent daemon: OK
Starting mDNSPosix daemon:
 +Writing /tmp/mDNSPosix.conf...OK
/etc/init.d/S99local(start): Finalizing system startup...
watchdog not started (userland have to keep it that way).
  +starting gpio_poller --disable-watchdog (watchdog is disabled)...
Indicating that boot was OK...
Setting bootstate to A0...
Unsetting bootcount...
bootcount: No matching variable to unset
Warning: couldn't unset bootcount.
/etc/init.d/S99local(start): OK
My next task was to determine a working login username and password. Fortunately, the same username and password that is used for the NSS4000’s web interface will work (as an unprivileged user) on the serial console. Unfortunately, attempts to guess the root password failed, so I resorted to restarting the system and interrupting the boot process. The standard boot string is:
boot /dev/sd0@0x100 root=/dev/scsibd2 hwrev=3
to which I added “single” to get the box to stop in single-user mode:
boot /dev/sd0@0x100 root=/dev/scsibd2 hwrev=3 single
At that point, I did a ^D to continue with the startup process (necessary to mount the filesystems on from the USB flash drive) and then did a “passwd root” to change the root password.
After that, I was able to read all files on the system, including one named “gpio.config” which described a “diagnostic jumper” that would enable the Dropbear SSH server (needed if I wanted to remotely connect to the box instead of using the serial console). After tracing out some wiring, I found that J34 is the jumper in question, located here:
A quick scrounge through the parts box yielded an appropriate jumper:
And I had my SSH console working.
That’s it for now – in a subsequent article I will discuss building the NSS4000 software from the Linksys GPL distribution, as well as adding additional utilities.
UPDATE: The diag jumper also causes additional testing while in the PMON2000 monitor, as well as preventing unattended booting (since one of the PMON diagnostics fails, autoboot is disabled). A better way to enable the dropbear SSH server is to leave the diag jumper off and to edit line 26 of the file /linuxrwfs/etc/init.d/S02hwdep to read /usr/sbin/dropbear_start.sh instead of /usr/sbin/dropbear_stop.sh.


