Archive for the 'Computers' Category

Dell Studio 155x 1080p Screen Upgrade

As promised, here’s the article on upgrading your Studio 155x from a 720p screen to a 1080p one.

First, I should caution you that I did this on a Studio 1558 with the ATI Radeon HD 5470 graphics option and a 720p LED panel. I can’t promise that it will work on models other than the 1558, or with the older ATI HD 4750 or built-in Intel graphics. If you have success with any of those, comment here and I’ll add that information.

Some people might ask why I didn’t purchase my 1558 with the 1080p screen in the first place. By the time I was ready to buy the laptop, Dell had cut way back on the available configurations as they were phasing out the Studio line. Also, if you look at used / refurbished 155x systems on eBay, you’ll see that most of them have the 720p screen and that 1080p units cost more (and have less selection) than purchasing a 720p unit and upgrading the screen yourself.

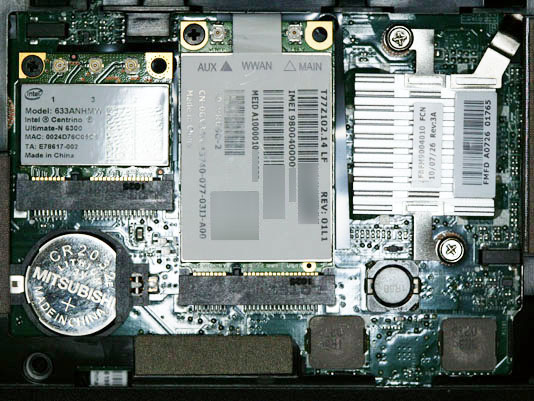
Refer to the service manual (or DCSE if you have it) for detailed disassembly procedures. With some practice, you can do this without dismounting the lid from the base, but for first-timers I’d recommend following the service procedures.

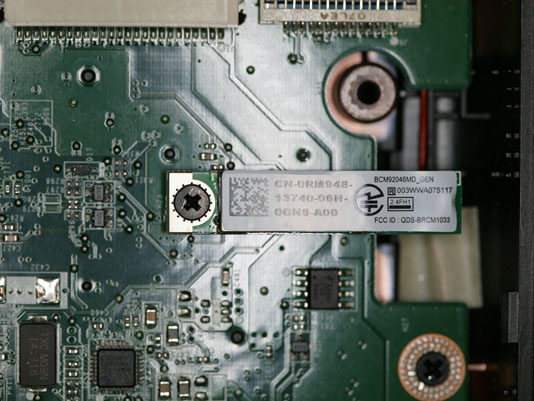
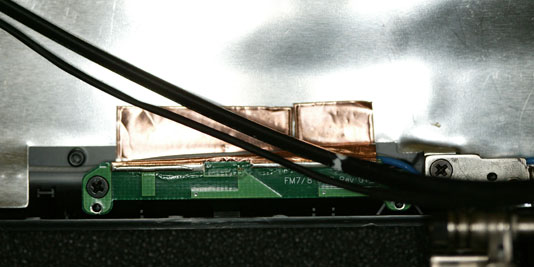
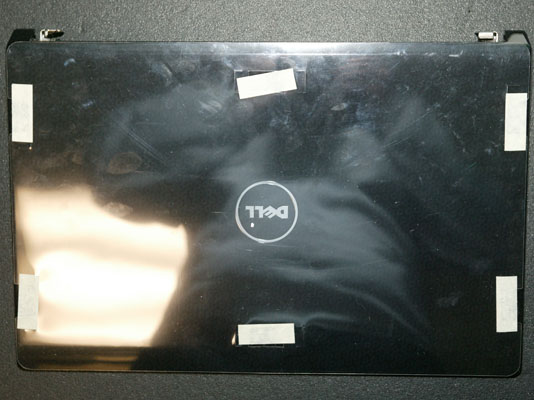
If you have a lid without the wireless broadband or Bluetooth antennas (see earlier post), this would be a good time to change lids since you’re going to have the system apart anyway. A spare bezel (interchangeable parts W440J or 06DV9) may be useful to have, in case you break any of the latch tabs when removing the old one.

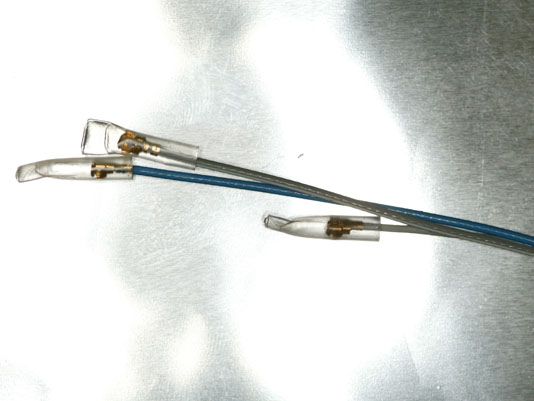
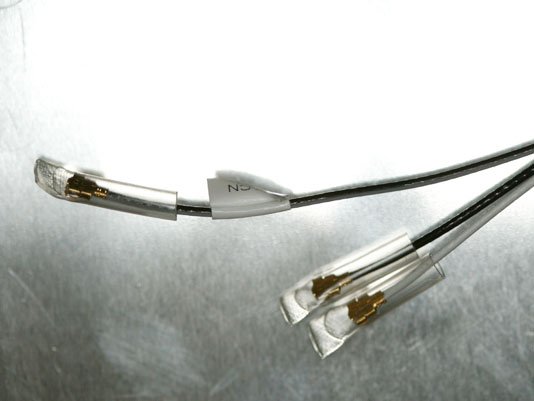
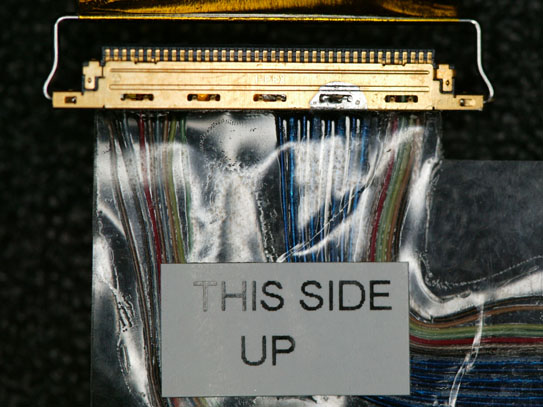
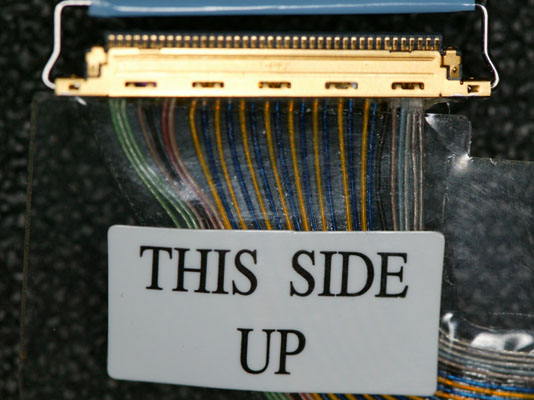
Assuming your 1558 has discrete Radeon HD5470 graphics, you will need a W805M cable. Refer to the parts list at the end of this article if your 1558 has integrated graphics. This connects the mainboard to the flat panel, and also includes the cable for the camera. You cannot re-use the W439J cable from your 720p display – it has different wiring. If you purchase a used cable, you will also need some double-sided tape to attach the cable to your new panel. Be careful when purchasing this cable – many eBay sellers think these 2 part numbers are interchangeable – they aren’t. To help you identify a cable in an eBay listing (watch out for “Picture may not be of the actual item” in the description), here are extreme close-up photos of the 2 cables.

This is the W439J cable for a 720p display (LED panel end). Note that there’s a big gap in the middle of the connector with no wires, and a sequence of blue and black (some look white due to the camera flash) wires to the right of the gap:
W439J (720p) cable

This is the W805M cable for a 1080p display (LED panel end). This cable has wires spaced pretty evenly throughout the connector. The sequence of yellow and blue wires indicates that this is for a 1080p panel:
W805M (1080p) cable

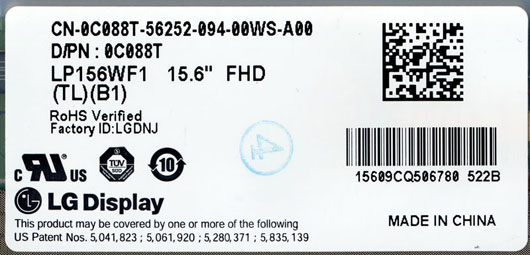
You will also need either a H162K (gloss) or C088T (semi-matte) 1080p LED panel. Watch out for “compatible” panels – these 2 part numbers have a display ID (EDID) coded into them, and the notebook won’t accept the display panel if this ID is missing. If purchasing on eBay, you might want to ask the seller for a photograph of the back of the panel, and/or a guarantee of a 100% refund if the panel isn’t compatible.

Here is what the back of the C088T panel looks like:
Back of the 1080p panel

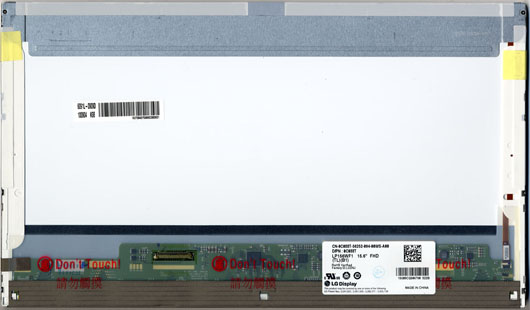
This is a close-up of the label with the Dell part number:
Dell part number sticker

The first thing I suggest doing is plugging your new cable into the new panel and running a few tests. Do NOT stick the tape on the cable to the panel yet. You can lean the new panel up against the lid (in front of the old panel) and plug the cable into the mainboard.

Your first test will be to run a panel power-up diagnostic. To do this, press and hold the “D” key on the keyboard (D for display) while pressing the power button. The display should cycle through a series of solid colors and then go dark. With this test, you’re verifying that you have the cable attached properly and that there are no bad pixels (or an acceptable number, if you purchased a panel with possible pixel defects to save money). A brief flicker before the panel displays the first solid color (white) is normal and not a defect with the panel.

If that test passes, power off the system and then power it back on. You should see the Dell logo and the system should then boot into Windows (or whatever operating system you are running). If you get a black screen and the system appears dead, you have a panel that does not have its EDID programmed (most likely), an incompatible panel, or you have a system that doesn’t support 1080p (not likely, at least if you have the same 1558 with HD 5470 graphics that I do).

At this point, you can shut down the system and commence the panel swap. Set your new panel aside while you remove the old panel from the lid. Be sure to carefully unplug the cable from the camera before pulling the old panel away from the lid. Set the old panel face-down on a padded surface (to prevent scratching it). Place your new panel on the padded surface in the same orientation. You should now see where the sticky tape holds the cable to the old panel (3 places – by the panel’s 40-pin connector, at the edge of the panel where the cable changes to round, and at the edge of the panel where the camera is located). Carefully peel the backing off the new cable’s sticky tape and stick it to the new panel. This will involve pressing (gently!) on two areas of the panel that have “Don’t Touch!” warnings.

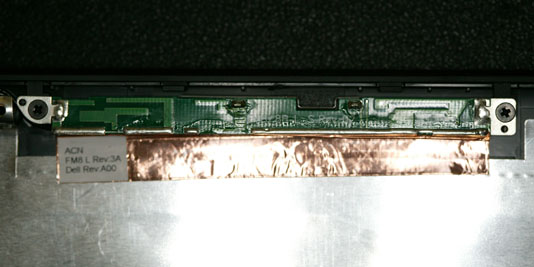
Now, remove the mounting brackets from the left and right sides of the old panel (2 screws on each side) and transfer them to the new panel. Left and right are NOT interchangeable, so keep track of what goes where. If you are building a whole new lid, you could use a set of spare brackets, part number W981J. You may need 4 screws to go with the brackets if they aren’t included. You might also want the camera, part number 7RGXF. With all of those parts, you can build a whole new lid and keep the original as a spare.

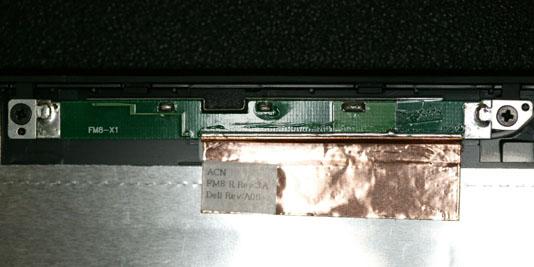
Carefully re-install the new panel, taking care to plug the webcam cable in before trying to seat the panel all the way. Re-attach the lid to the base of the PC if you removed it. Plug the display and camera cables into the mainboard and boot your operating system to ensure functionality. Be sure to test the webcam as well as the display – you don’t want to have to disassemble the lid once you put the bezel back on. Make sure that the display cable is routed under the tab at the point where it makes a 90-degree turn toward the connector. If the cable isn’t properly located, you’ll get a bulge in the keyboard surround because it won’t seat properly. I’ve observed this on new systems from Dell as well.

If the display and camera are operating correctly, you can now attach the bezel to the lid and replace any other parts that you removed to work on the lid, such as the keyboard surround.

You may find that the default Windows text size is too small when using a 15.6″ 1920 x 1080 display. You can refer to this Microsoft article to select a larger text size. Dell ships their 1080p 155x systems with this set to 125%. Dell also modifies the login screen font size, which requires editing the Windows Registry. You can find an article describing the procedure in Microsoft Answers.

Here are the most common part numbers you will need:

  • 4DKNR – 1558 motherboard with discrete Radeon HD5470 graphics
  • G939P – 1558 motherboard with integrated CPU graphics (no quad-core support, often doesn’t have WWAN connector)
  • 2X6C1 – heatsink/fan assembly for discrete Radeon HD5470 graphics
  • 644D0 – Heatsink for integrated CPU graphics
  • W956J – Fan for integrated CPU graphics
  • W805M – display cable for discrete (1920 x 1080 display only)
  • W439J – display cable for discrete (all except 1920 x 1080 display)
  • NHKMC – display cable for integrated (1920 x 1080 display only)
  • RWH6V – display cable for integrated (all except 1920 x 1080 display)

Converting a system from integrated graphics to discrete Radeon HD5470 graphics will require a 4DKNR motherboard, a 2X6C1 heatsink/fan assembly, and a W805M or W439J display cable, depending on your screen resolution.

Edit: Updated 24-Mar-2021 to fix dead link to Dell service manual and add a section on motherboard and display cable part numbers and upgrading from integrated to discrete graphics.

APC Symmetra RM Fan Replacement

Two years ago I wrote about the second set of replacement batteries for my APC Symmetra RM UPS. Those batteries are still working, but at 8+ years old the various fans in the UPS were getting a bit tired and making various high-pitched whines and grating noises, so it was time for a complete set of replacement fans.

There are 3 different types of fans used in the Symmetra RM – ones in the SYPM2KU power module (2 fans each), ones in the SYTF2 transformer (2 fans each – see footnote), and one in the Symmetra RM chassis itself.

The fans used in the power module are Mechatronics F8025X24B-FHR which is rather hard to find. I purchased mine from Online Components. You will have to splice the connectors from the old fans onto the wires of the replacement fans. If your UPS has sufficient redundancy to allow removal of one power module at a time, you can replace these fans without shutting down the UPS.

The fans used in the transformer are NMB-MAT 3115PS-12T-B30. These are widely available and I purchased mine from Newark Electronics. Note that it is perfectly normal for only one of the two fans to run – the other one is used only when the transformer detects an overheating condition. The cable for these fans just plugs into the fan – no re-wiring is necessary. You will have to shut down the UPS and disconnect the transformer to work on the fans, however.

The main Symmetra RM fan is a Comair-Rotron FE12H0X-039453 which is a semi-custom part for APC. This fan also has a sensor to report its speed, so you can’t just substitute a random 80mm fan. Fortunately, APC makes it possible to order this part at a reasonable price. It is APC part 490-0024B. I ordered mine from CDW, and despite it being a special-order item, it shipped rapidly. This fan comes with the necessary connector pre-installed. It can be replaced while the UPS is running, however the UPS MUST be placed into bypass mode via the switch on the rear panel, or the UPS will shut down with a “System fan fault” error when you unplug the old fan.

The old fans provided nearly 9 years of continuous service, and not all needed replacing – I just decided it would be better to replace them all at once rather than one-at-a-time as they became noisy.

Dell Studio 155x Wireless / Networking Options

Today I’m going to start a discussion regarding the late-model (1555/1557/1558) Dell Studio laptops and their wireless and networking options. This started when I ordered a Dell Wireless 5620 card for a Studio 1558 computer I had purchased. This is the combined mobile broadband / GPS card intended for the Studio 155x systems.

I was quite surprised when I opened the access panel on the bottom of the computer to install the card and discovered that there were no antenna cables for it in there, despite the service manual saying there would be.

As I continued to investigate, I found a number of places where the service manual was flat-out wrong, and a bewildering array of Dell part numbers. Let’s get one thing out of the way – the “Service Manual” that Dell makes available on their web site is NOT the manual that their techs use. Their internal manual has a lot more information and goes into things in a lot more depth than the customer service manual. Dell doesn’t make their internal manual available to the public, but you might have some luck with search terms like “Dell Certified Systems Expert” or “Dell Foundations 2009 Portables”.

Anyway, let’s get the easy stuff out of the way first. That will be Bluetooth. The customer service manual claims that there are 3 mini-PCI Express sockets underneath the bottom cover. That is only true for some systems. On both of my 1558’s there was a soldered-in chip where the manual says the Bluetooth socket is located. I am not sure what that chip is (it is under a heat sink). It isn’t the ATI graphics chip as that is next to the CPU and handled by the main system heat sink and fan:

Mini-PCI Express Sockets

That’s OK, because that card needs an external bluetooth antenna, which your system probably doesn’t have. Fortunately, there is a second Bluetooth socket on the other side of the motherboard. That socket takes a Wireless 365 bluetooth card that doesn’t need an external antenna:

Alternate Bluetooth location

Unfortunately, getting to this location involves a near-complete disassembly of the laptop. For the gruesome details, look at the service manual in the link above.

The first picture in this article shows an Intel Ultimate-N 6300 MIMO (3-antenna) WiFi card and the Wireless 5620 card installed in the card bay. Careful observers may have noticed that the 6300 card doesn’t have a Dell part number on it. That’s because I purchased a generic retail card, not the Dell one, as I could get it for a better price that way. Installing the cards is the easy part. If you didn’t order your computer with the 5620 option, you won’t have the antennas you need. When I asked Dell why they sold a card that couldn’t be used, they just sort of mumbled “dunno”. I don’t understand why they did this – it created a huge assortment of part numbers for them to inventory (aside from making upgrades harder). The Studio 155x was available in at least seven different lid colors. Each of those has at least three possible antenna configurations – WiFi only, WiFi + mobile broadband, and WiFi + mobile broadband + Bluetooth. That creates 21 different part numbers to stock instead of 7 if they built the systems with all the antennas.

Dell won’t sell you a replacement lid (even if you could figure out the correct part number) because it isn’t considered a customer-replacable part. So it is off to eBay, where I discovered that sellers had no idea what options the lids they were selling included. I received flat-out incorrect answers from a number of sellers I’ve found to be reliable in the past.

The next part of this article could be called “A Field Guide to Studio 155x Lids”. It will teach you what to look for in an eBay auction, as well as how to tell if a lid is really new as the seller says. Later on I’ll tell you the part numbers for the most common lid and bezel to help your searches.

This sequence of four photographs shows the four corners of the inside of a Studio 155x lid. I’ll start at the top left and proceed clockwise. This first picture shows you the WiFi antenna. It will have 2 wires, a black and a white, that connect to the WiFi card in the base. This particular antenna also includes one of the mobile broadband antennas which is black with a gray stripe. Note that this is one particular style of lid – others can have silver-colored foil instead of the copper you see here, may have black circuit boards instead of green ones, and may have different markings. The important thing is whether or not there is an antenna at each location, not what it looks like:

Top Left

Next is the antenna at the top right. If your lid has this antenna, it supports mobile broadband. This antenna has one wire, gray with a white stripe:

Top Right

Now we have the bottom right antenna. If your lid has this antenna, it supports Bluetooth. This antenna has one wire, which is blue:

Bottom Right

Last is the bottom left. This is the MIMO (3rd) antenna for WiFi. All lids have this. The antenna has one wire, gray:

Bottom Left

Now that you know how to tell what antennas are included on a lid, I’ll show you how to tell if it is new or used. New lids will have clear plastic caps on all antenna wires (anywhere from 3 to 6, depending on what antennas are installed):

Caps on antenna wires

Caps on antenna wires

If your lid doesn’t have all the caps installed, it is almost certainly a used lid. Next, the antenna wires and the wire from the power switch will be taped near the middle of the lid with masking tape:

Tape on inside of new lid

The outside of a new lid will also have a piece of protective clear plastic on it, with 6 cutouts for 6 pieces of masking tape:

Tape and protective cover on outside of new lid

One thing to be careful of is sellers who mark their listings “Photograph may not be the actual item”, or who list the condition as “New – Other”. I’ve found lots of New – Other listings which were actually parts stripped off of systems.

The part numbers you probably want are W855P (sometimes written 0W855P) and W440J. The W855P part is a lid with every possible antenna installed, in the “Black Chain-link” color (which seems to be the most popular color). The W440J is the black bezel that snaps on the inside of the cover. You’re almost certainly going to damage at least one of the latch tabs on your old bezel when you take the display apart, so you may as well order a new one with the lid and just use that. Part number 06DV9 is an interchangeable part number for the bezel.

If, for some reason, you want the part number for some other combination of color and antenna (like Plum Purple w/ mobile broadband but no Bluetooth), add a comment to this entry and I’ll post it.

The next 155x article will be the highly-anticipated tutorial on replacing a 720p display with the 1080p one.

Edit: Updated 24-Mar-2021 to fix dead link to Dell service manual and provide currect motherboard part number (in comments).

Dell Bluetooth Keyboard & Mouse on Windows 7

I’m still working on my comprehensive Dell Windows 7 upgrade article, but I have enough information about the Dell “Bluetooth Keyboard & Mouse” bundle that I figured I’d post it now…

Dell had offered a Bluetooth keyboard and mouse in a number of combinations and different part numbers. The particular one I have is Dell Part Number 0YJ101 (YJ101) which includes a USB Bluetooth transceiver. Other versions of this package were targeted at notebooks that had Bluetooth built in, and therefore didn’t include the transceiver. The keyboard part number is DH953 and the mouse is DH956. [I’m including the part numbers here so people searching for those numbers find this article.]

This package was actually made by Logitech for Dell. The Dell driver was last updated nearly 2 years ago, in March of 2008 (Version 3.22, A02-00, here). Looking on the Optiplex 760 page, this package is supported through Windows Vista, but not on Windows 7.

Fortunately, a little searching on the Logitech web site finds the SetPoint software, version 4.80, here. If the link doesn’t work, search for drivers for “Cordless Desktop® LX 300” on Logitech’s web site. Both 32-bit and 64-bit versions of SetPoint are available.

I successfully downloaded and installed the 64-bit version on a fresh Windows 7 Ultimate x64 install. The keyboard and mouse are both recognized as Dell devices and are fully functional. After installation, SetPoint will check regularly for software updates.

The next issue I had (which wasn’t new with the Windows 7 install) was what can best be described as a “drunk mouse” – response to mouse movements would be delayed, and would then wildly overshoot the intended location. I’d had this happen under Windows XP as well, but not as often. After thinking about it for a while, I formed a theory that this was due to radio frequency (RF) interference from the Optiplex 755 chassis. The problem would get much worse when I was running software that stressed my new video card (an ATI Radeon HD5770), such as the Unigine benchmarks. The Bluetooth receiver normally plugs into the USB ports on the back of the case, right next to the video card. I unplugged it and used a 6 foot USB A/A shielded extension cable to relocate the transceiver away from the system unit and the problem seems to have disappeared. It might be possible to avoid the problem by plugging the transceiver into one of the USB ports on the front of the case, but I didn’t want it sticking out where it could get bumped and snap off.

NSS4000 / NSS6000 Update

Linksys has transferred maintenance of the NSS products (and others) to Cisco. As part of this, Cisco released a new version of the firmware for the NSS4000 / NSS6000, version 1.14-20.

One of the things Cisco claims for this release is “improved security”. Apparently, as part of this some of the tricks on my previous page don’t work any more. So here are some updates:

1) dropbear – /linuxrwfs/etc/init.d/S02hwdep is now a link to /etcrc/init.d/_hwdep, which is on a read-only filesystem and can’t be edited. Fortunately, /linuxrwfs is still read-write, so just do: cd /linuxrwfs/etc/init.d; mv S02hwdep S02hwdep_old; cp -p /etcrc/init.d/_hwdep ./S02hwdep and then edit the file as described in my previous post.

2) su – /usr/sbin/busybox will complain “su: This applet requires root priviledges!” if you try to issue the su command. To get around this, do: cp -p /bin/busybox /etc/busybox; chmod 4555 /etc/busybox. Then use /etc/busybox su to su. Don’t forget that users need to be listed in the wheel entry in /etc/group as well.

3) passwd – when I tried to add a new user, while I could edit the passwd file, when I tried to change the password for that user, the user wouldn’t show up in the shadow password file. The solution was to copy one of the other lines in the shadow file, change the username, and re-issue the passwd command.

PC Power & Cooling “Silencer 500 Dell” Review

As I mentioned in my previous post, I had a power supply fan fail in one of my Dell Optiplex 755 systems. Although I received a replacement supply from Dell (the system is under warranty for another two years) I decided to look into a larger power supply, as I’d upgraded the hard drive, CPU, and video card. The standard Dell supply is only 305 watts and I expect it is running near its rated capacity.

I’ve been using PC Power & Cooling products since the company was founded – the first product I used was a fan that bolted onto the back of an IBM PC XT to improve airflow. I haven’t used their products recently, as the few systems I’ve built from scratch have come with power supplies already installed in the cases.

I took a look at their site and found the Silencer 500 Dell power supply which stated that it was a direct replacement for the Dell power supply in my Optiplex 755. It also said it was a direct replacement in 61 other Dell systems, which should have given me a clue that the unit was more generic than it was letting on.

This power supply slightly exceeds the efficiency rating of the stock Dell power supply (82% vs. 80%) while providing up to 500 watts continuous power.

I unpacked the power supply, which came in a nice printed box (my earlier PCP&C supplies had come in generic brown cardboard boxes, which indicates how far power supplies have come in being recognized as a critical component of the system). There was a huge wad of cables coming out of the supply – far more than the Optiplex 755 needed.

I did a test fit of the supply in the chassis and discovered that there were a number of problems. First, the AC power cord connector interfered with part of the case. Next, the case had tabs which were designed to slot into the Dell power supply. The PCP&C supply was lacking those slots, so it was impossible to mount the supply perfectly squarely in the case.

The first change I made was to modify the AC power cord connector on the supply so it would fit in the case. This involved cutting off the plastic “ear” on one side of the connector. Fortunately there is a metal tab on the connector which will help retain it once the power supply is installed in the chassis:

Next, I had to come up with a plan to deal with all the unused power cables:

My first idea was to tie them up neatly in the space between the power supply and the back of the DVD drives:

However, it was a very tight fit and it severely reduced the airflow through the power supply, as the vents on the inside face of the supply were nearly completely obscured by the mass of cables.

As I had already voided the warranty by trimming the power connector, I decided to open the supply and remove all of the un-needed cables. I could have cut them off outside the supply, but then I would have to individually insulate all of the cut ends and it would be really ugly.

After a brief round of cutting, the excess cables were removed:

As part of this process, I removed the floppy drive power connector (mini 4-pin) and installed it on the end of one of the SATA power cable branches. As supplied by PCP&C, the floppy connector is at the very end of a long chain of full-size 4-pin connectors (used for legacy hard drives and CD-ROMs, of which this system had none). I trimmed one of the SATA power cable branches to 2 SATA power connectors and installed the floppy connector at the end. I also removed the last connector from the other SATA power cable branch, leaving 2 connectors, and routed it down to the hard drive bay in the system. This produced a set of cables that was far more manageable:

I don’t recommend doing this yourself – aside from voiding the warranty, you could easily damage the power supply or injure yourself. PCP&C says that they don’t believe in power supplies with modular cable systems (see FAQ #3 here). However, as long as they are going to continue to represent the supply as fitting 62 different Dell models, they need to come up with some system to deal with un-needed cables. Also, it is important to remember that there are already a pair of connectors on each cable – one on the cable end and the other on the device it is plugged into. PCP&C has no control over those connector styles as they’re dictated by industry standards. But they would have unlimited choices for modular power connectors if they decided to use them.

Also, while they could justify the cables by saying that they don’t know what cards and peripherals a customer might have, there is no excuse for the interference of the power connector with the PC case – this is clearly a case (no pun intended) of someone looking at the specs of the Dell power supply and saying “sure, ours will fit” without ever checking it for themselves. It should be possible to move the power connector closer to the center of the power supply without requiring a complete re-design of the power supply and without imparing the fitment in the other Dell cases. PCP&C offers custom power supplies, but I shudder to think what the cost would be for a one-off solution to the problems I encountered.

While I’m satisfied with the solution I came up with, I can’t recommend this supply for use in the Optiplex 755 (due to the power connector mounting issue) or in any other space-limited Dell enclosure (because of the large number of un-needed cables).

Dell Optiplex 755 Upgrade Project

Overview

It has been a little over a year since I installed three new Dell Optiplex 755 systems (see my earlier review here and here). A memory problem in one of the systems and a moaning power supply fan in another (oddly, not from cat fur) caused me to open a support case with Dell for replacement parts.

This lead to the dreaded “since I’m in here, I wonder what I could do to improve things” thoughts. Since I purchased these systems a year ago, a number of faster components have become available, or have had major price reductions. The main items that I wanted to speed up were: hard drive, video and CPU. I’ll discuss each of these in turn.

Hard drive

As I mentioned in my previous articles, I’ve been very loyal to Seagate in the past. However, they’ve fallen on their face in a number of areas recently. First, they dropped the warranty on many of their drives from 5 years to 3 years. Second, they have had some heavily-publicized firmware problems, including a “fix” that rendered some classes of drives completely non-functional. Plus, drives from other vendors out-perform the Seagate products at certain capacities. One of these is at the 250-300GB range, where Western Digital offers the VelociRaptor™. This drive is offered in 3 configurations, which differ only in the way the drive is mounted. The BLFS version is a bare 2.5″ drive, good for servers with backplanes that require this size drive. It won’t work in a notebook as it is much taller than a normal notebook drive (15mm vs. the normal 9.5mm for a notebook drive). The GLFS version is the previous drive mounted in a 3.5″ frame (which WD calls an IcePack™). However, due to the industry standards for location of the SATA power and data connectors differing for 2.5″ and 3.5″ drives, this version cannot slot in to an enclosure that has backplane connectors for 3.5″ drives. This brings us to the HLFS version, which is similar to the GLFS except that the bare drive is mounted in a slightly different location on the IcePack and there is a passive adapter board which has the connectors in the right spot for mating with SATA backplanes. Since many online merchants list the GLFS and the HLFS at the same price, I don’t know why WD bothers with the GLFS version. There are apparently some minor cooling differences between these versions, but I don’t feel they are enough to justify keeping the GLFS around.

I purchased the HLFS version as the Optiplex has a rather unusual mounting (side-to-side vs. the more common front-to-back) orientation and the cables would line up better. Plus, it would keep my options for future re-use of the drive open.

Here is the drive ready to go into the chassis. The red strip on the right side is the adapter circuit board I mentioned above:

Here is the drive mounted in the chassis. I’ll discuss the non-standard power cable in a later post:

Video card

These systems originally shipped with ATI Radeon HT 2400 XT cards. As I mentioned in my earlier review, that card didn’t support the Dual Link DVI mode that I needed to operate the 3008WFP monitor at its maximum resolution of 2560 x 1600. I replaced it with a different version of the HD 2400 that supported Dual Link. Since then, there have been a number of additional generations of ATI video cards. Unfortunately for me, most of these are dual-slot configurations due to the large fans found on the card. In the Optiplex 755, the video card occupies the uppermost slot in the chassis and there’s no place for the second bracket to go. And that is the only PCIe x16 slot on the chassis.

Looking around, I found the Radeon 3650 which was a single-slot solution. It supported the Dual Link DVI that my monitor required. It also supported the DisplayPort interface which was also found on my monitor. As finding “Built by ATI” video cards is getting harder and harder, I selected the HIS H365F512DPNP card. I have some Cyberlink software installed on this PC which requires a HDCP link to the monitor. Unfortunately, the 3008WFP monitor doesn’t support HDCP when operating in Dual Link mode, so I have to drop the resolution down to 1920 x 1200 or I get an annoying message about my display not being supported and then playback stops.

Since I now had both a monitor and a video card that allegedly supported DisplayPort at 2560 x 1600, I gave that a try. It was a total failure – the display would go into screen saver mode immediately at that resolution. At lower resolutions it would randomly cycle in and out of screen saver mode every few seconds. So much for that idea – back to Dual Link DVI. The monitor is revision A01, which according to Dell has no issues with DisplayPort. But this technology seems to not be ready for deployment.

Here’s the card installed in the system. By the way, I didn’t turn the fan so the HIS logo was right-side-up – that’s just the way the fan stopped when I shut the system down to take the picture:

CPU

I had ordered the systems with the Core 2 Quad Q6600 CPU as the only faster quad core part offered by Dell at the time was the Q6700 which wasn’t a lot faster (2.66GHz vs. 2.40GHz) and which was a lot more expensive. Since then, Dell started offering parts in the Q9xxx family. However, the top-of-the-line Q9650 still isn’t available from Dell in these systems.

Looking at the specs on Intel’s web site, I couldn’t see any reason why a system that supported the Q9550 wouldn’t support the Q9650, so I decided to give it a try. Let’s compare the specs of the Q6600 vs. the Q9650 to see what sort of performance improvements I might get:

Q6600
  • 2.40 GHz clock speed
  • 1066MHz bus speed
  • 8MB cache
  • 65nm technology
Q9650
  • 3.00 GHz clock speed
  • 1333MHz bus speed
  • 12MB cache
  • 45nm technology

The change from a 65nm feature size to 45nm means that despite the faster clock and larger cache, the thermal specification remains the same at 95W. This means that the existing CPU heatsink and fan could be re-used, which is important as the Optiplex 755 uses a custom cooling solution and not the heatsink / fan provided with the boxed CPU.

After installing the new CPU, a quick power-on test shows that the system properly detected the new CPU:

Dell systems tend to not provide the assorted overclocking tweaks found on some motherboards, so this is likely as fast as this system is going to get unless Intel releases a faster CPU. I had spec’d PC6400 memory when I ordered the systems, and that is the fastest memory the Q35 chipset supports. With 4 matching 1GB modules, the memory runs in what Intel calls “Dual Channel Interleaved” mode, which is the fastest mode. Since the motherboard doesn’t provide tweaks, this CL5 memory is the fastest that can be installed in the system. (All of the memory I’ve found that runs at CL4 and faster still reports itself as CL5 in SPD and expects the tuner to override the SPD settings).

The system is noticibly faster. Backups to my network file server run at around 70MB/second now, compared with 50MB/second before the upgrade. Windows startup is much improved.

One thing I discovered when I re-installed Windows and all my software from scratch – I had previously thought that the Intel Ethernet chipset on this motherboard didn’t support jumbo frames (because the option didn’t appear in the configuration menu as delivered by Dell). But after installing the latest drivers from Intel, the jumbo frame option appeared and I enabled it.

New Year, new UPS batteries…

In my experience, batteries in an APC UPS (regardless of the model – from the smallest Back-UPS to a Symmetra) seem to last about 3 years if  I’m lucky. This is in locations with temperature-controlled environments that never go over 80 degrees F.

The following discussion is about replacing the batteries in my APC Symmetra RM UPS. However, much of the information applies to other APC models – only the battery size and quantity will differ.

Depending on the model of UPS involved, the first warning you get may be when everything powers down during the bi-weekly UPS self-test. Fortunately, on the larger models like my Symmetra SYH6K6RMT, there’s advance warning when the batteries start to fail. I have 12 SYBT2 battery packs installed in that UPS, and it started complaining about bad batteries about 6 months ago. This gradually reduced the UPS runtime from 3 hours to about an hour and a half as more and more battery packs failed. As soon as the UPS reported a battery pack failure, I removed the pack from the UPS to prevent damage from trying to charge bad batteries.

The last time I replaced the batteries was in September 2005. At that time, I paid a premium for CSB HR1221-WF2 batteries because I was told they were the best available. Unfortunately, a good number of the CSB batteries swelled up, making it very hard to press the tabs to un-latch the SYBT2 from the battery frame. The “dimple” you see in the middle of the battery is where the battery pressed against the latching tab:

In fact, one of the CSB batteries actually burst and leaked electrolyte (acid) into the metal battery case. Part of this may not have been CSB’s fault – some of the batteries had June 2005 date stickers from the vendor (who shall remain nameless), but the actual batteries were manufactured in September 2003. You can see this in these photos of the same battery:

While not all of the batteries were this out-of-date, none of them could be remotely described as “fresh”. According to CSB, if a sealed lead acid battery isn’t kept charged, it will eventually self-discharge. In general, after 6 months of storage with no charging, the battery will have lost 30-35% of its charge. While this isn’t a disaster by itself, if the battery is left discharged for an extended period it may never charge up to its full capacity again. CSB’s own spec sheet states that this battery can be stored for “more than 6 months”. I bet that if the battery could be stored for 12 months (or the 21 months that the above battery sat in the vendor’s warehouse) they’d have said so. That spec sheet also lists a 50% charge at the point where the battery will be permanently damaged if left in that condition. It says “Supplementary charge may often fail to recover the capacity.”

Regardless of age, it is my opinion that a sealed lead acid battery should not swell up or burst unless operated way out of specification. Looking at the status data from one of the battery frames: “1 4 0F WH2149 2149 RT0190 I-0.0 V136.6″, I can see that  the float voltage is 13.66 volts (136.6 / 10) which is in the middle of the accepted range for these batteries – 13.6~13.8V/77°F (25°C) and that the batteries aren’t taking any charging current (the I-0.0 part of the status).  So there is no reason for these batteries to swell or burst, other than something in the batteries themselves. Note that this only applies when all of the batteries in the battery pack are the same brand / model / date code. Since the batteries are wired in series, dissimilar batteries may result in overcharge of some while under-charging others.

Looking at prices from my previous vendor for the CSB HR1221WF2 battery, they seemed to have doubled from around $18 in 2005 to around $36 now. This battery only has a 1-year warranty. I could purchase two generic $17 batteries with 1-year warranties and still come out ahead of the CSB product. Plus, I’m a firm believer in the saying “Fool me once, shame on you. Fool me twice, shame on me.” and so I’m not going to purchase any more CSB batteries.

I did a lot of research and decided to purchase the Tempest TR5-12A battery from Batteryspec.com. I selected this battery because it has a 2-year warranty, while most other brands in this size have a 1-year warranty. It was also available with F2 terminals – while APC uses the F2 size, most other applications use the smaller F1 terminal. I spent a lot of time looking at both other battery brands and other vendors. I was quite surprised that many vendors wouldn’t even respond to my inquiry about purchasing 136 batteries. A number of vendors wanted to sell me “equivalent” batteries with F1 terminals and have me install terminal adapters for F2 terminals. I went with Batteryspec because they answered all my questions promptly, and because they are actually the manufacturer / importer of the battery (if you look at the web sites of Batteryspec, IMC Power and Tempest, you’ll see that they all have the same toll-free telephone number).

Let’s compare pricing: 10 TR5-12A batteries from Batteryspec – $156.00 vs. replacement SYBT2 from APC (they don’t sell just the batteries – you need to purchase the whole module) – $419.00. The SYBT2 can be found for as little as $300.00, but that’s still twice the price of 10 batteries from Batteryspec. Plus, you’d be discarding a perfectly good SYBT2 housing.

Batteryspec didn’t have 136 batteries in stock, but had them on order. That was fine with me, as they’d all be fresh from the factory and be from the same production lot. Here are the 136 batteries unloaded from the truck (571 pounds!), 10 per carton:

The batteries are spread out to distribute the load across my floor beams.

Here is an opened carton of new batteries. Note that each battery is individually wrapped in a plastic bag and has protective covers over the battery terminals. We’ll get to that in a bit.

Looking at the date code on the batteries (08J18YJ) we can see that they were made on October 18th, 2008 (J = October). Given that I received them on December 18th, that’s pretty fresh considering they spent a lot of time on a container ship coming from China.

Now it is time to install the new batteries in the SYBT2 housing. I’m not going to detail the steps, because if you can’t figure it out you shouldn’t be doing it. An assembled SYBT2 delivers about 136 Volts DC and is quite lethal. As Agent Stanley Goodspeed says in the movie The Rock, “The second you don’t respect this, it kills you.”

I will give you one suggestion, though – make sure that the battery cable connectors make firm contact with the battery terminals. If they don’t, use small needle-nose pliers to adjust the connectors (unplug them from the battery first). Loose connectors lead to high resistance, which may cause the battery pack to not provide full output when the UPS goes into battery mode. 

Here is the complete housing with new batteries installed:

Here is a close-up showing the way the batteries are connected. Remember what I said before about the plastic insulators on the battery tabs? Those insulators come in handy when loading the batteries into the housing. Also, remember what I said about many vendors wanting to sell batteries with adapters for F1 terminals instead of batteries with F2 terminals? Where, exactly, is there room for those adapters in here?

While I have no proof that these batteries will last any longer than any other brand, the fact that the manufacturer offers a warranty that is twice as long as their competitors leads me to believe that they’ll be better. Batteryspec’s web page says: “6 Year Service Life Under Float Service @77°F / 2 Year Warranty. NonFloat Service / 1 Year Warranty.” I’ll be very happy if I get 6 years out of them.

Here’s a picture of two of the three battery frames for this UPS. Each frame holds four SYBT2 battery packs. The dangling cable in the middle of the picture is the front panel cable for the 03 battery frame. The labels on the middle of each battery pack are stickers I made with the date of battery replacement. If you replace all the batteries in the UPS, you can just set the “Last battery replacement” date in the UPS (and, indeed, you should do that). But if you’re just replacing some of the batteries, it is useful to keep track of when each set of  batteries was replaced without having to remove the batteries from the UPS to check their date codes.

In case you’re wondering why I ordered 136 batteries when 12 frames of 10 batteries each is only 120 total, I ordered another 16 for two other UPS’s that take 8 batteries each.

By the way, I recommend that you not do a  run-time calibration after replacing the batteries, unless you really need to know the exact amount of time the UPS will run on batteries. It needlessly cycles the batteries and reduces their service life.

In case you want to investigate other brands, the only batteries I’ve found in this size that have F2 terminals are:

  • Tempest TR5-12A
  • CSB HR1221WF2
  • BB Battery HR5.8-12
  • Long WP5-12

Here is a picture of the last 2 from that list (the others were shown above):


Reasons to purchase replacement batteries from APC:

  • Guaranteed to work with your UPS
  • Won’t void your APC warranty / service contract (see note)
  • Come with all leads / fuses / mounting hardware needed
  • Free shipping of your old batteries to a recycling center

Note: A Federal law known as the “Magnusson-Moss Warranty Improvement Act” states that manufacturers can’t disallow a warranty claim because of after-market parts unless the manufacturer can show that the after-market parts caused the problem. For example, if you install a new radio in your car, the manufacturer can’t deny a warranty claim for engine trouble. However, batteries are so integral to the function of a UPS that you may have a problem making a Magnusson-Moss claim with after-market batteries.

Reasons to not buy replacement batteries from APC:

  • Cost – generally much more expensive than other suppliers
  • No control over what brand of battery you get
  • Possibility of getting a worn-out battery due to stale inventory at reseller
  • Some models (like the SYBT2) are not available as just batteries – APC only sells the complete battery+enclosure package. Why discard a perfectly good enclosure?

Things to watch out for when buying generic batteries:

  • Generally, no leads, fuses or mounting hardware supplied
  • Possibility of getting a worn-out battery due to stale inventory
  • What you see may not be what you get – brand may be different
  • You may get adapters instead of the correct size terminals

Regardless of who you purchase your batteries from, you should consider the total price – batteries, shipping charges, and any tax – being made from lead, UPS batteries are very heavy. Some vendors offer free shipping, while others charge quite a lot. Also, some states require collection of either a refundable deposit or a non-refundable disposal fee at the time of sale. This generally applies only when you and the vendor are located in the same state, and that state charges the fee. Battery Council International has a table here which may be useful.

Watch out for claims of “refurbished” batteries. There isn’t anything that can be done to refurbish a sealed lead acid battery. The only thing that can be done is to recycle it – separate it into its component parts – lead, plastic, etc. and use those materials to build new batteries. So, when you see a vendor’s claim of “refurbished”, this means you’re getting somebody else’s old, used batteries. You don’t know what the battery’s manufacturing date is or how it has been treated by previous owners – was it run hot and/or frequently discharged? While researching this article, I found one vendor who was selling used APC RBC14 batteries (at least they didn’t claim to have refurbished them) but stated that they came with a 1 year warranty from APC. I doubt that that is the case, since even a new APC battery only has a 1 year warranty (from date of first retail sale) and these were definitely not new.

Note that it is possible to refurbish a battery pack like the SYBT2. At a minimum, that would consist of installing a matched set of replacement batteries and functional testing in a UPS. But you should make sure you understand what the vendor means by “refurbished” – I’ve seen some cases where all that was done was to give the battery pack a quick shot with an air duster.

One last thing to watch for if you search for an APC RBC part number is vendors that show up in the search results, but who actually sell you some other brand of battery. If you know about this up front and you don’t mind (perhaps because it is priced below the genuine APC part), go ahead and purchase it. On the other hand, if you think you’re getting a genuine APC battery and wind up with a generic one, you’ll probably be unhappy – and even more so when the vendor tells you “of course you can return it and we’ll refund the purchase price, but you have to pay the return shipping, and by the way we won’t refund the shipping we charged you either”.

Once you have your new batteries installed, you need to dispose of the old ones in a responsible manner (not just out in the garbage). Many communities have either curbside collection or drop-off service for hazardous waste, which includes lead-acid batteries. There’s probably a limit to how many they will take from a resident, however – I’ve never tried to give them a couple hundred batteries, so I don’t know what the limit is, but it is likely a lot smaller than that.

Fortunately, I live within a few miles of a commercial recycler that is glad to accept these batteries – in fact, for large quantities they’ll even pay for them!

If you purchased a genuine new APC RBC, there should be a label for free shipping to one of APC’s recycling partners. Otherwise, you’ll need to make your own arrangements to either ship or drop off your old batteries. Be sure to factor in any costs for shipping and/or disposal of your old batteries when you purchase replacements. You can visit the EPA’s battery site for more information.

Dell Optiplex 755 review – Part 2

I’ve been using the first of the Optiplex 755 systems (in my digital darkroom) for a few days now, and it has been working quite well. One of the tasks I perform there is to prepare non-copyright out-of-print books and articles for both my web site and for traditional hardcopy reprinting. I was able to completely process a 380 page book in only a few hours – from scanning to Photoshop touchup to OCR to producing the final output. This task would have taken considerably longer with my old dual-Xeon Dell Precision 530. And that doesn’t take into account the delays in scanning each page (which lead to getting bored and wandering away from the project).

I also replaced the Dimension 8400 in my bedroom / home theater system with one of the other Optiplex 755 systems yesterday, and that one is doing fine as well. The old Dimension 8400 box will get the cat fur vacuumed out of it and re-purposed somewhere else.

One of the biggest improvements with the new systems is that my actual work isn’t interrupted by the background tasks of spyware scanning, anti-virus protection, and so forth. Those tasks still run, but I still have at least 2 CPU cores available for “real” work.  

Here’s a list of some pros and cons I’ve found with the new systems:

Pros:

  • Inexpensive – compared to an identical HP configuration, Dell was several hundred dollars less expensive per system.
  • Has Windows XP Professional – I really don’t want to deal with Vista, and it is nice to be able to get XP Pro pre-installed, with manufacturer support for XP drivers.
  • Comes with “name brand” components – Seagate hard drive, ATI-manufactured (as opposed to ATI-licensed) video card, and so on.
  • FAST!
  • Has “legacy” PS/2 ports and a second serial port (which, believe it or not, I use).
  • Case can be easily opened. If you’ve ever tried to open a Dell XPS system, the instructions go like this: “With your first hand, grasp the front top of the case. With your second hand, grasp the front bottom of the case and press both hands together. While pressing with two hands, use your third hand to slide the side of the case to the rear while using your fourth hand to hold the case steady“.
  • Mounting hardware for the second CD / DVD drive is provided, attached to the back of the filler plate. Likewise for the second hard drive and floppy / media reader bay (if you didn’t order a floppy drive or media reader).

 Cons:

  • On-board Gigabit Ethernet should support Jumbo Frames.
  • PS/2 ports take up one I/O card slot, and slots are limited on this system. I’d prefer to see these ports elsewhere on the case.
  • Case is somewhat flimsy compared to previous generations of Dell systems (Dimension 8400, XPS, etc.). It still seems to be of good quality, though.
  • Dell should pre-install the SATA I/O cables for the second hard drive and second CD/DVD drive.

I should mention that Dell just released the A07 BIOS update for the Optiplex 755. The web site lists the change only as “Intel microcode changes”. However, the previous BIOS version posted to the Dell support site was A04 (A05 was available on request from support). So I don’t know what other changes were made in A05 or the unreleased A06.

Also, SpeedFan 4.34 Beta 38 now correctly reports the CPU core temperatures (in 4.33 they were off by 15 degrees). SpeedFan still doesn’t see the case fan speed sensor or control, but perhaps in a future version. It definitely is under software control as the BIOS changes the fan speed when the system starts up.

BitTorrent DNA – A *REALLY* Bad Idea

As part of my computer upgrades (see my other blog posts), I had made a list of the software installed on my old computer. I visited the various distribution sites and downloaded and installed the latest versions of everything.

While the new computer was sitting idle, I started getting popups from Spyware Doctor informing me that “Spyware Doctor has blocked access to a bad web site”. The threat listed was “Trojan.Storm_Spam_Server”. Now, I didn’t have any Internet Explorer windows open (in fact, nothing was running except the utilities I run at startup – which doesn’t include the BitTorrent client).

Doing some poking around with WinDump led me to the btdna.exe process in \Program Files\DNA. Oddly, this process couldn’t be killed from Task Manager – I had to rename the executable and reboot the PC.

Once I did that, the Spyware Doctor popups stopped. I proceeded to deinstall both BitTorrent and DNA from my system, and they won’t be coming back.

I’ve been a casual user of BitTorrent for quite some time, mostly for downloading things like FreeBSD distribution ISOs. But this new behavior is inexcusable, for a number of reasons:

  • The application starts without the user’s permission – even if the user selects to not run the BitTorrent client at startup, btdna starts.
  • There doesn’t seem to be any way to shut it down permanently without deinstalling it.
  • It is interacting with many known bad sites – who is going to vouch for the program’s security?
  • Why is it interacting with any sites at all? I never started a download or viewed any content that it could “accelerate”.
  • Why is it stored in \Program Files\DNA? Is this an attempt to conceal that it is related to BitTorrent?
  • Upon viewing the official BitTorrent DNA web site, they claim that this is an accelerator that content providers can purchase access to in order to shift the burden of delivering content onto viewers. Yet the end user isn’t informed that this is happening. This is good for the content providers and BitTorrent. What’s in it for the user? Particularly if the user pays per KB of data transferred through their ISP (as in the case of a mobile user with a wireless network card, for example).

All in all, this strikes me as a really bad idea. My suggestion is to deinstall the DNA service (Start / Control Panel / Add or Remove Programs / DNA should do it, but you might want to check your \Program Files\DNA directory after deinstalling, just in case). Depending on whether you’re as disturbed about this as I am, you might want to deinstall BitTorrent as well and look at a different Torrent client.