Dell Studio 155x 1080p Screen Upgrade
As promised, here’s the article on upgrading your Studio 155x from a 720p screen to a 1080p one.
First, I should caution you that I did this on a Studio 1558 with the ATI Radeon HD 5470 graphics option and a 720p LED panel. I can’t promise that it will work on models other than the 1558, or with the older ATI HD 4750 or built-in Intel graphics. If you have success with any of those, comment here and I’ll add that information.
Some people might ask why I didn’t purchase my 1558 with the 1080p screen in the first place. By the time I was ready to buy the laptop, Dell had cut way back on the available configurations as they were phasing out the Studio line. Also, if you look at used / refurbished 155x systems on eBay, you’ll see that most of them have the 720p screen and that 1080p units cost more (and have less selection) than purchasing a 720p unit and upgrading the screen yourself.
Refer to the service manual (or DCSE if you have it) for detailed disassembly procedures. With some practice, you can do this without dismounting the lid from the base, but for first-timers I’d recommend following the service procedures.
If you have a lid without the wireless broadband or Bluetooth antennas (see earlier post), this would be a good time to change lids since you’re going to have the system apart anyway. A spare bezel (interchangeable parts W440J or 06DV9) may be useful to have, in case you break any of the latch tabs when removing the old one.
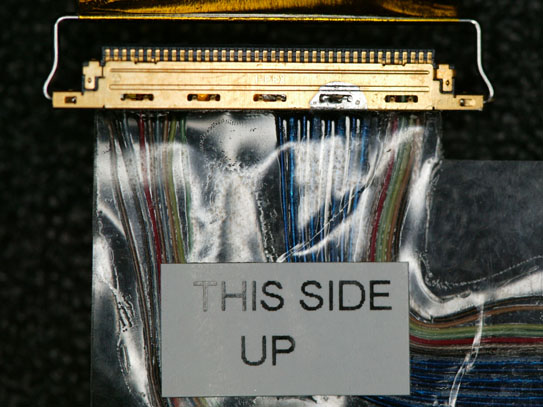
Assuming your 1558 has discrete Radeon HD5470 graphics, you will need a W805M cable. Refer to the parts list at the end of this article if your 1558 has integrated graphics. This connects the mainboard to the flat panel, and also includes the cable for the camera. You cannot re-use the W439J cable from your 720p display – it has different wiring. If you purchase a used cable, you will also need some double-sided tape to attach the cable to your new panel. Be careful when purchasing this cable – many eBay sellers think these 2 part numbers are interchangeable – they aren’t. To help you identify a cable in an eBay listing (watch out for “Picture may not be of the actual item” in the description), here are extreme close-up photos of the 2 cables.
This is the W439J cable for a 720p display (LED panel end). Note that there’s a big gap in the middle of the connector with no wires, and a sequence of blue and black (some look white due to the camera flash) wires to the right of the gap:
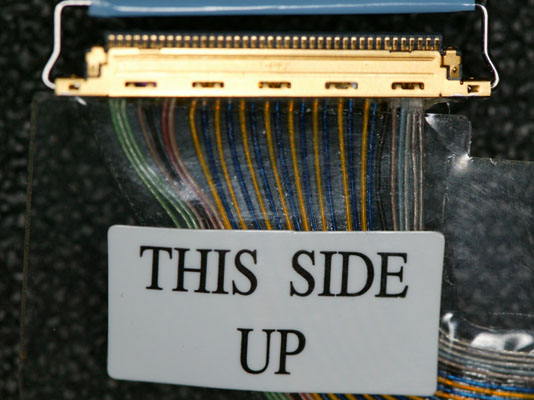
This is the W805M cable for a 1080p display (LED panel end). This cable has wires spaced pretty evenly throughout the connector. The sequence of yellow and blue wires indicates that this is for a 1080p panel:
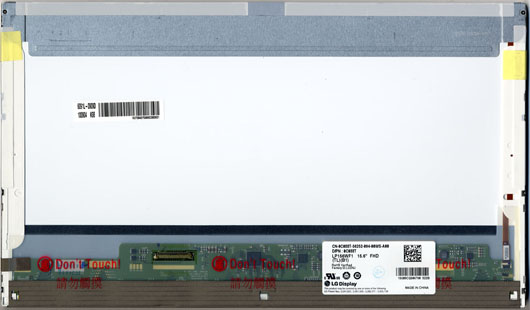
You will also need either a H162K (gloss) or C088T (semi-matte) 1080p LED panel. Watch out for “compatible” panels – these 2 part numbers have a display ID (EDID) coded into them, and the notebook won’t accept the display panel if this ID is missing. If purchasing on eBay, you might want to ask the seller for a photograph of the back of the panel, and/or a guarantee of a 100% refund if the panel isn’t compatible.
Here is what the back of the C088T panel looks like:
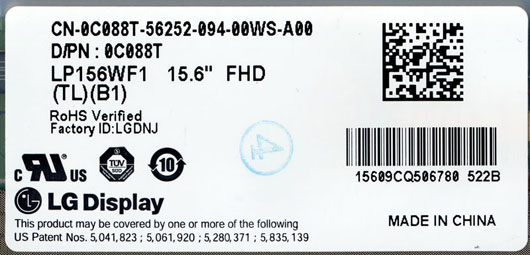
This is a close-up of the label with the Dell part number:
The first thing I suggest doing is plugging your new cable into the new panel and running a few tests. Do NOT stick the tape on the cable to the panel yet. You can lean the new panel up against the lid (in front of the old panel) and plug the cable into the mainboard.
Your first test will be to run a panel power-up diagnostic. To do this, press and hold the “D” key on the keyboard (D for display) while pressing the power button. The display should cycle through a series of solid colors and then go dark. With this test, you’re verifying that you have the cable attached properly and that there are no bad pixels (or an acceptable number, if you purchased a panel with possible pixel defects to save money). A brief flicker before the panel displays the first solid color (white) is normal and not a defect with the panel.
If that test passes, power off the system and then power it back on. You should see the Dell logo and the system should then boot into Windows (or whatever operating system you are running). If you get a black screen and the system appears dead, you have a panel that does not have its EDID programmed (most likely), an incompatible panel, or you have a system that doesn’t support 1080p (not likely, at least if you have the same 1558 with HD 5470 graphics that I do).
At this point, you can shut down the system and commence the panel swap. Set your new panel aside while you remove the old panel from the lid. Be sure to carefully unplug the cable from the camera before pulling the old panel away from the lid. Set the old panel face-down on a padded surface (to prevent scratching it). Place your new panel on the padded surface in the same orientation. You should now see where the sticky tape holds the cable to the old panel (3 places – by the panel’s 40-pin connector, at the edge of the panel where the cable changes to round, and at the edge of the panel where the camera is located). Carefully peel the backing off the new cable’s sticky tape and stick it to the new panel. This will involve pressing (gently!) on two areas of the panel that have “Don’t Touch!” warnings.
Now, remove the mounting brackets from the left and right sides of the old panel (2 screws on each side) and transfer them to the new panel. Left and right are NOT interchangeable, so keep track of what goes where. If you are building a whole new lid, you could use a set of spare brackets, part number W981J. You may need 4 screws to go with the brackets if they aren’t included. You might also want the camera, part number 7RGXF. With all of those parts, you can build a whole new lid and keep the original as a spare.
Carefully re-install the new panel, taking care to plug the webcam cable in before trying to seat the panel all the way. Re-attach the lid to the base of the PC if you removed it. Plug the display and camera cables into the mainboard and boot your operating system to ensure functionality. Be sure to test the webcam as well as the display – you don’t want to have to disassemble the lid once you put the bezel back on. Make sure that the display cable is routed under the tab at the point where it makes a 90-degree turn toward the connector. If the cable isn’t properly located, you’ll get a bulge in the keyboard surround because it won’t seat properly. I’ve observed this on new systems from Dell as well.
If the display and camera are operating correctly, you can now attach the bezel to the lid and replace any other parts that you removed to work on the lid, such as the keyboard surround.
You may find that the default Windows text size is too small when using a 15.6″ 1920 x 1080 display. You can refer to this Microsoft article to select a larger text size. Dell ships their 1080p 155x systems with this set to 125%. Dell also modifies the login screen font size, which requires editing the Windows Registry. You can find an article describing the procedure in Microsoft Answers.
Here are the most common part numbers you will need:
- 4DKNR – 1558 motherboard with discrete Radeon HD5470 graphics
- G939P – 1558 motherboard with integrated CPU graphics (no quad-core support, often doesn’t have WWAN connector)
- 2X6C1 – heatsink/fan assembly for discrete Radeon HD5470 graphics
- 644D0 – Heatsink for integrated CPU graphics
- W956J – Fan for integrated CPU graphics
- W805M – display cable for discrete (1920 x 1080 display only)
- W439J – display cable for discrete (all except 1920 x 1080 display)
- NHKMC – display cable for integrated (1920 x 1080 display only)
- RWH6V – display cable for integrated (all except 1920 x 1080 display)
Converting a system from integrated graphics to discrete Radeon HD5470 graphics will require a 4DKNR motherboard, a 2X6C1 heatsink/fan assembly, and a W805M or W439J display cable, depending on your screen resolution.
Edit: Updated 24-Mar-2021 to fix dead link to Dell service manual and add a section on motherboard and display cable part numbers and upgrading from integrated to discrete graphics.

January 6th, 2011 07:09
Please note that in my Dell articles I refer to components by the actual Dell part number found on the part. Dell often creates several part numbers that all cross-reference to some other part number. Thus, you can’t always determine the actual part number from the Dell “system configuration” report on their web site. For example, most 155x’s with 1080p displays show as having the W696M display. I’ve opened a number of those systems and the displays were actually H162K. When more than one part number is used on the actual part and they are interchangeable, I try to list all of the part numbers (if I know them).
May 17th, 2011 05:29
Hi Terri! Thanks for a jolly good article. I am amidst some screen upgrade antics myself – my 1558 came with a 1366×768 (720p, I suppose) glossy panel, and I wanted to switch to a matte screen. So I thought, what the heck, let’s upgrade the resolution as well. So I ordered a 1440×900, I received it last weekend, I plugged it in straight away (I still hadn’t seen this post of yours, so I didn’t know a different ribbon was needed) and, lo and behold… it didn’t work. More precisely, when I switched on the lappie it was like going back to my Commodore 64 times, with 8 bit graphics and a very basic color palette (plus some very thick vertical scanlines which I didn’t have on the Commodore). I just concluded I would have no human way to do this upgrade.
So, today, just when I was about to return the screen (I’m based in UK and I ordered it from Canada, so the P&P alone -including that for sending it back- matches the cost of the screen) I found your post, and I learnt about the need for a different ribbon. The question is, would you know what ribbon would I need for this 1440×900 screen, and where could I get one? I would be indebted.
Thanks a lot in advance, and congrats for an excellent blog,
Ave
May 17th, 2011 05:39
I forgot to say, just for the record: the upgrade was motivated by the original LCD failing after less than one year from buying the laptop – I have to press the upper rim of the screen bezel several times a day to bring it back to normal. Definitely not nice, and I put it down to the amount of flexing that veeeery flimsy lid gets every time you move it up and down… I wonder how it would be possible to reinforce the lid in order to avoid ruining the next LCD panel…
Cheers,
Ave
May 17th, 2011 08:13
Just a correction: the screen I would want to install is not 1440×900, but 1600×900 (WXGA++).
(Sorry about the scattered comments! Please feel free to edit or merge them as you see fit! 🙂
Cheers,
Ave
May 17th, 2011 10:05
@Ave – Was the 1600 x 900 resolution ever offered by Dell on the 1558? I’ve only ever seen the 1366 x 768 (720p) and 1920 x 1080 (1080p) screens on this model. If the hardware doesn’t know about your replacement display with a different resolution, I can see how it can get confused. I do know that the H162K and C088T panels (both 1080p) work with the W805M cable, at least if your system has the ATI graphics option. If you’re using the built-in graphics, you might need a different cable – particularly if the cable you have in there now is something other than a W439J.
The UK eBay site shows a dozen listings for the W805M cable priced between £10.95 and £13.99, so the easiest thing to do would probably be to get one of those cables and see if it helps.
May 17th, 2011 10:32
Hi Terri,
Thanks for your quick reply, I’ve just ordered the W805M cable on eBay.
I must say I hadn’t heard of that resolution option (1600 x 900) on this Dell before, either; I was just browsing for a 1366×768 LCD replacement on this shop (laptopscreens.com) and they had this among their (many) options for 1558, so I got it in the heat of the moment thinking “what the heck… it should work” (etc, etc). I actually thought it was 1440×900, until I checked this morning!
I will let you know if it actually works with the W805 cable (fingers crossed).
Thanks a lot for your help,
Ave
May 20th, 2011 18:31
Hi again, Terri,
I’m very glad to say it did indeed work. The previous cable was a W439J. So, the W805 works with both 1920×1080 and WXGA++ (1600×900). I’m really happy with this screen: the viewing angle is much better, the color reproduction seems much improved, and, of course, these annoying reflections are gone. And I find this resolution just perfect for me.
So, thanks a lot–and I mean it!
Ave
July 29th, 2011 06:01
Hi, Terri
Thanks for this article. i’m using dell inspiron 15r(N5010) laptop, which has a 1366×768 led screen. i really want to upgrade it to fhd, but i’m wondering if it can use the W805 cable as studio 155x does, do you have any idea?
August 24th, 2011 15:51
@grantchan – I don’t know. Probably the best thing to do is to open it up and see what cable is currently in there. It might be different, since there isn’t a standard location for the video connector on the laptop motherboard. The connector on the panel end will probably look like one of the two pictures in my article.